How to Restore to Factory Default via the RESET Button?
Posted: 26 Dec 2025, 19:12
Applicable Versions
TOS 5 / TOS 6
Applicable Models
Models that require removing the cover:
F2-424, F4-424, F4-424 Max, F4-424 Pro, F6-424, F6-424 Max
Models that do NOT require removing the cover:
F2-425, F2-425 Plus, F4-425, F4-425 Plus, F4-SSD, F8-SSD, F8-SSD Plus
Issue Description
When the device experiences an abnormal power outage, or when an NVMe M.2 SSD or HDD fails, the TOS system may not function properly.
Solution
Since NVMe M.2 SSDs do not support hot swapping, it is not possible to reinstall the TOS system by simply removing and reinserting the SSD when a TOS failure occurs.
For HDD-related issues, when resetting the TOS system using the RESET button, it is not necessary to remove the HDD. The system can be reset directly based on the existing drives.
Operating Steps
I. Steps for Models That Require Removing the Cover
Step 1:
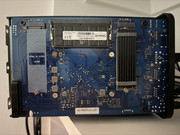
Use a screwdriver to remove the screws and open the side cover.
Step 2:
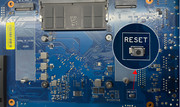
Press and hold the RESET button on the product’s mainboard. After 30 seconds, without releasing the RESET button, continue holding it while briefly pressing the power button to start the device.
Once you hear three consecutive beeps, you may release the RESET button.
Step 3:
Use the TNAS PC Client to re-scan for the TNAS device, and follow the instructions in the client to restart the TOS system initialization process.
II. Steps for Models That Do NOT Require Removing the Cover
Step 1:
Power off the device. There is no need to remove the NVMe M.2 SSD or HDD.
Step 2:
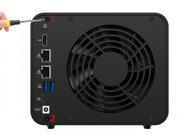
With the device powered off, use a paperclip to press and hold the RESET button on the back of the product. After 30 seconds, without releasing the RESET button, continue holding it while briefly pressing the power button to start the device.
Once you hear three consecutive beeps, you can release the paperclip.
(Using the F4-425 Plus as an example, as shown in the figure below)

Step 3:
Use the TNAS PC software to re-search for your TNAS device. Clear your browser cache, select the device, click “Login” to enter the Initialization page, and follow the on-screen instructions to install a new TOS system.
TOS 5 / TOS 6
Applicable Models
Models that require removing the cover:
F2-424, F4-424, F4-424 Max, F4-424 Pro, F6-424, F6-424 Max
Models that do NOT require removing the cover:
F2-425, F2-425 Plus, F4-425, F4-425 Plus, F4-SSD, F8-SSD, F8-SSD Plus
Issue Description
When the device experiences an abnormal power outage, or when an NVMe M.2 SSD or HDD fails, the TOS system may not function properly.
Solution
Since NVMe M.2 SSDs do not support hot swapping, it is not possible to reinstall the TOS system by simply removing and reinserting the SSD when a TOS failure occurs.
For HDD-related issues, when resetting the TOS system using the RESET button, it is not necessary to remove the HDD. The system can be reset directly based on the existing drives.
Operating Steps
I. Steps for Models That Require Removing the Cover
Step 1:
Use a screwdriver to remove the screws and open the side cover.
Step 2:
Press and hold the RESET button on the product’s mainboard. After 30 seconds, without releasing the RESET button, continue holding it while briefly pressing the power button to start the device.
Once you hear three consecutive beeps, you may release the RESET button.
Step 3:
Use the TNAS PC Client to re-scan for the TNAS device, and follow the instructions in the client to restart the TOS system initialization process.
II. Steps for Models That Do NOT Require Removing the Cover
Step 1:
Power off the device. There is no need to remove the NVMe M.2 SSD or HDD.
Step 2:
With the device powered off, use a paperclip to press and hold the RESET button on the back of the product. After 30 seconds, without releasing the RESET button, continue holding it while briefly pressing the power button to start the device.
Once you hear three consecutive beeps, you can release the paperclip.
(Using the F4-425 Plus as an example, as shown in the figure below)
Step 3:
Use the TNAS PC software to re-search for your TNAS device. Clear your browser cache, select the device, click “Login” to enter the Initialization page, and follow the on-screen instructions to install a new TOS system.