How to Properly Install and Use TOS 7 on the 425 Plus Series TNAS

New system installation, system re-install
User avatar
RyanYang
TM Support
Posts: 1141
Joined: 01 Dec 2020, 11:50
China

How to Properly Install and Use TOS 7 on the 425 Plus Series TNAS

Post by RyanYang »

Applicable Models:
F2-425 Plus, F4-425 Plus (NOT Applicable to: F2-425, F4-425)


Description:
Prior to operation, please verify the BIOS version. For your convenience in offline viewing, we have provided a PDF version of this guide, which you can download and save..
  • For devices with BIOS versions MTWL0101.V03, MTWL0101.V04, MTWL0101.V05, or MTWL0101.V06, please refer to this guide and choose the appropriate method.
  • The following BIOS versions require no extra adjustments to update and operate TOS 7 normally: MTWL0101.V07 and BJFX-TWLX-108.
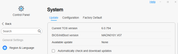
How to check the BIOS version: Go to the Update page in the TOS Control Panel to view the BIOS version.
Image

Issue Symptoms:
Prerequisite: TNAS devices that meet the BIOS conditions described above.
1. If the system disk is an NVMe M.2 SSD installed in Slot 3, the device boots into the initialization screen after updating to TOS 7.
2.If the NVMe M.2 SSD in Slot 3 is selected as the system disk during TOS 7 installation, the device boots into the initialization screen after reboot.

Cause:
On F2-425 Plus and F4-425 Plus devices with BIOS versions MTWL0101.V03, MTWL0101.V04, MTWL0101.V05, or MTWL0101.V06, there is a defect in the boot priority handling of the NVMe M.2 SSD in Slot 3 within the BIOS.

Note:
If you plan to install TOS 7 on the NVMe M.2 SSD in Slot 3 in the future, you still need to refer to Method B to update the BIOS.

If you do not plan to use Slot 3 for TOS 7 installation, you do not need to update the BIOS or adjust the boot order. For temporary solutions, you may use Method A or Method C.

Solutions:
You can choose one of the following three methods that best fits your situation:
Method A: Migrate the system disk or change the slot.
Update:
1.Before updating to TOS 7, go to Storage Manager > Disk in the TOS Control Panel. In the System Disk section, migrate the system disk from the Slot 3 NVMe M.2 SSD to an SSD in another slot, then proceed with the TOS 7 update.
2.Move the system disk to Slot 1 or Slot 2 so that it is no longer installed in Slot 3, then proceed with the system update.

Installation:
When installing the system, select a SATA HDD or SATA SSD as the system disk.

When installing TOS 7 using a TOS 7 USB installer, do not select the NVMe M.2 SSD installed in Slot 3 (the TOS 7 USB installer will be released later).

Method B: Adjust the disk boot order.
Adjusting the BIOS boot order is only a temporary solution. If you replace disks or reinstall the system, you will need to modify it again.
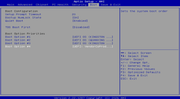
1. Enter the BIOS page.
Install all disks you use. With the device powered off, connect the TNAS to a monitor using an HDMI cable and connect a keyboard. Press the power button, then immediately press Del or Esc repeatedly in short taps until the BIOS interface appears. Do not hold the key down; tap it 1-2 times per second.
2、Disable UTOS Boot First.
In the BIOS, press the Right Arrow key to go to the Boot page. Press the Down Arrow key to select UTOS Boot First, press Enter, then press the Down Arrow key to select Disabled, and press Enter to confirm.
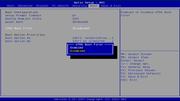
Image
3、Adjust the boot order.
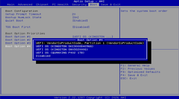
After disabling “UTOS Boot First”, press the ↓ arrow key to select the last Boot Option entry, then press Enter to modify it.
Use the arrow keys to select the USB boot entry (onboard USB boot device), then press Enter to confirm the selection.
Image
Image
4. Save and exit.
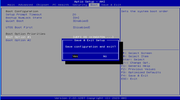
After setting the USB boot device as the last boot option, press F4. When prompted to save and exit, press Enter to confirm. The system will then reboot, and you can proceed with the TOS 7 update.
Image

Method C: Update the BIOS Version
After updating the BIOS, the NVMe M.2 SSD in Slot 3 can be used normally. TOS 7 can then be installed, updated, and used without issues.
1.Confirm whether the current BIOS version of your F2-425 Plus or F4-425 Plus is one of the following: V03, V04, V05, or V06. If so, follow the steps below to update the BIOS.

2. Download the latest BIOS file for your model:
F2-425 Plus:F2-425_Plus_BJFX-TWLX-108.zip
F4-425 Plus:F4-425_Plus_BJFX-TWLX-108.zip
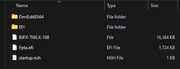
3.Prepare a USB drive (32 GB or smaller) and format it as FAT32. Extract the downloaded BJFX-TWLX-108.zip file, and copy all extracted files to the root directory of the USB drive.
Image
4、Remove all disks from the TNAS, insert the prepared BIOS update USB drive into the TNAS, connect the TNAS to a monitor with an HDMI cable, and connect a USB keyboard. Press the power button, then immediately press Del or Esc repeatedly in short taps until the BIOS interface appears. Do not hold the key down; tap it 1-2 times per second. You can also check whether the BIOS Version on the home page is one of the versions mentioned above.

Image
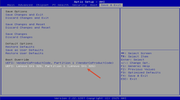
5、On the BIOS interface, press the → arrow key to go to the Save & Exit tab. Then use the ↓ arrow key to select the BIOS update USB entry, and press Enter to confirm.
If you accidentally select the onboard USB boot entry, the system may boot into the OS installation interface. In this case, restart the device and select the correct BIOS update USB entry again.
Image
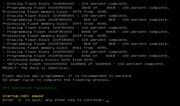
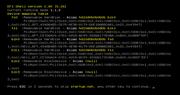
6、When this screen appears, wait for the countdown to complete. The BIOS update will start automatically and takes approximately 1-3 minutes. Do not press any keys during this process. Wait until the message “FPT Operation Successful” appears, indicating a successful update.
Image
Image
7、After the success message appears, press Enter. The TNAS will reboot automatically. After a few seconds, the TNAS will beep once, indicating that the hardware self-test has passed. When you hear the beep, immediately press Del or Esc repeatedly in short taps until the BIOS interface appears. Then follow Step 5 to select the BIOS update USB device again and press Enter to confirm.
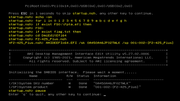
8、After selecting the BIOS update USB drive for the second time, wait for the operation to complete automatically. When finished, the page shown below will appear, indicating that all operations have been completed. You can then remove the BIOS update USB device and update or install TOS 7 normally.
Image
To contact our team, please send email to following addresses, remember to replace (at) with @
Technical team: support(at)terra-master.com (for technical support)
Service team: service(at)terra-master.com (for purchasing, return, replacement)
User avatar
Gremlin
Gold Member
Posts: 1627
Joined: 02 Dec 2022, 22:31
Great Britain

Re: How to Properly Install and Use TOS 7 on the 425 Series TNAS

Post by Gremlin »

I have F2-425 Plus but I am NOT currently using nvme slot 3. However, It seems logical to update bios to the appropriate version in case things change in the future. Would it be better to update to Tos7-Release (from Beta) first and then update bios or vice-versa?
F5-221 TOS7.0.0777 - 4x4TB (Ironwolf) Traid
F2-424 TOS7.0.0777 - 2x500GB nvme (P3) Traid, 2x6TB HDD (HGST) Traid
F2-221 TOS7.0.0777 - 1x3TB Ext4, 1x4TB Btrfs
F2-425+ TOS7.0.0777 - 2x500GB nvme (P3) Traid, 2x6TB HDD (EXOS) Traid
User avatar
MikeZhang
TM Support
Posts: 381
Joined: 05 Sep 2023, 22:21

Re: How to Properly Install and Use TOS 7 on the 425 Series TNAS

Post by MikeZhang »

Gremlin wrote: 23 Jun 2026, 16:44
It's recommended to update BIOS version first, then update TOS version to avoid potential inconvenience
To contact our team, please send email to following addresses, remember to replace (at) with @

Technical team: support(at)terra-master.com(for technical support)
Service team: service(at)terra-master.com(for purchasing, return, replacement, RMA service)
User avatar
Gremlin
Gold Member
Posts: 1627
Joined: 02 Dec 2022, 22:31
Great Britain

Re: How to Properly Install and Use TOS 7 on the 425 Series TNAS

Post by Gremlin »

MikeZhang wrote: 23 Jun 2026, 17:37
Thank you.
F5-221 TOS7.0.0777 - 4x4TB (Ironwolf) Traid
F2-424 TOS7.0.0777 - 2x500GB nvme (P3) Traid, 2x6TB HDD (HGST) Traid
F2-221 TOS7.0.0777 - 1x3TB Ext4, 1x4TB Btrfs
F2-425+ TOS7.0.0777 - 2x500GB nvme (P3) Traid, 2x6TB HDD (EXOS) Traid
User avatar
rfbjr
Silver Member
Posts: 400
Joined: 16 May 2024, 23:43
United States of America

Re: How to Properly Install and Use TOS 7 on the 425 Series TNAS

Post by rfbjr »

So right now my F4-425 Plus has all three M.2 as a RAID 5 Hypercache. It sounds like at some point I should follow the steps and update my BIOS in case I use the M.2's in a different way. I just checked my BIOS is: MTWL0101.V05
F6-424 & F4-425 Plus at 7.0.0777
F4-424 Pro also at 7.0.0777
D4-320
User avatar
Gremlin
Gold Member
Posts: 1627
Joined: 02 Dec 2022, 22:31
Great Britain

Re: How to Properly Install and Use TOS 7 on the 425 Series TNAS

Post by Gremlin »

rfbjr wrote: 23 Jun 2026, 21:42
I'm going to hold off updating for now. Then I plan to find a couple of spare usb drives and do the bios updates first. (425+ and 424). Hopefully by then the 'noise' will have died down a bit and the "system wide" updates will be available to permit auto updates from Tos6 directly (as mentioned elsewhere).
F5-221 TOS7.0.0777 - 4x4TB (Ironwolf) Traid
F2-424 TOS7.0.0777 - 2x500GB nvme (P3) Traid, 2x6TB HDD (HGST) Traid
F2-221 TOS7.0.0777 - 1x3TB Ext4, 1x4TB Btrfs
F2-425+ TOS7.0.0777 - 2x500GB nvme (P3) Traid, 2x6TB HDD (EXOS) Traid
User avatar
rfbjr
Silver Member
Posts: 400
Joined: 16 May 2024, 23:43
United States of America

Re: How to Properly Install and Use TOS 7 on the 425 Series TNAS

Post by rfbjr »

All of mine are updated to v746. I guess I lucked out, only my F4-424 Pro has the system on the M.2. But the BIOS was already at .08 due I'm assuming to the warranty replacement I had on that unit. As for the other two I'm in no rush to touch migrate the system disk, so no rush to update and BIOS settings or the BIOS itself.
F6-424 & F4-425 Plus at 7.0.0777
F4-424 Pro also at 7.0.0777
D4-320
User avatar
Rainman
Posts: 3
Joined: 27 Oct 2025, 03:48
Great Britain

Re: How to Properly Install and Use TOS 7 on the 425 Series TNAS

Post by Rainman »

My F4 425 plus is showing System Disk as being on NvMe Disk 1 and 2, so I assume I am not affected.

If I wanted to upgrade the BIOS as I have V04.
First power down the NAS.
Remove all drives.
Is that REMOVE all 4 HDD drives and all 3 NvMe M.2 SSD drives?
Then power up following the procedure above?
After updating the BIOS do you then power off and re-install all the HDD and SSD drives then power up again?
User avatar
MikeZhang
TM Support
Posts: 381
Joined: 05 Sep 2023, 22:21

Re: How to Properly Install and Use TOS 7 on the 425 Series TNAS

Post by MikeZhang »

Rainman wrote: 24 Jun 2026, 07:58
Is that REMOVE all 4 HDD drives and all 3 NvMe M.2 SSD drives?
Yes please remove all HDD and SSD

Then power up following the procedure above?
Yes follow the steps as per instruction above

After updating the BIOS do you then power off and re-install all the HDD and SSD drives then power up again?
Yes power off the NAS after you have completed all steps and install all disks back to your NAS then power it on.
To contact our team, please send email to following addresses, remember to replace (at) with @

Technical team: support(at)terra-master.com(for technical support)
Service team: service(at)terra-master.com(for purchasing, return, replacement, RMA service)
User avatar
Gremlin
Gold Member
Posts: 1627
Joined: 02 Dec 2022, 22:31
Great Britain

Re: How to Properly Install and Use TOS 7 on the 425 Series TNAS

Post by Gremlin »

RyanYang wrote: 23 Jun 2026, 10:39
Method C: Update the BIOS Version

3.Prepare a USB drive (32 GB or smaller) and format it as FAT32.
An odd turn of phrase imo.
1GB is smaller than 32GB - will that work?
What is the minimum size of USB drive that will work?
F5-221 TOS7.0.0777 - 4x4TB (Ironwolf) Traid
F2-424 TOS7.0.0777 - 2x500GB nvme (P3) Traid, 2x6TB HDD (HGST) Traid
F2-221 TOS7.0.0777 - 1x3TB Ext4, 1x4TB Btrfs
F2-425+ TOS7.0.0777 - 2x500GB nvme (P3) Traid, 2x6TB HDD (EXOS) Traid
Post Reply

Return to “Initialization & Installation”