
F2-425 Plus, F4-425 Plus (NOT Applicable to: F2-425, F4-425)
Description:
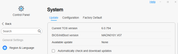
Prior to operation, please verify the BIOS version. For your convenience in offline viewing, we have provided a PDF version of this guide, which you can download and save..
- For devices with BIOS versions MTWL0101.V03, MTWL0101.V04, MTWL0101.V05, or MTWL0101.V06, please refer to this guide and choose the appropriate method.
- The following BIOS versions require no extra adjustments to update and operate TOS 7 normally: MTWL0101.V07 and BJFX-TWLX-108.
Issue Symptoms:
Prerequisite: TNAS devices that meet the BIOS conditions described above.
1. If the system disk is an NVMe M.2 SSD installed in Slot 3, the device boots into the initialization screen after updating to TOS 7.
2.If the NVMe M.2 SSD in Slot 3 is selected as the system disk during TOS 7 installation, the device boots into the initialization screen after reboot.
Cause:
On F2-425 Plus and F4-425 Plus devices with BIOS versions MTWL0101.V03, MTWL0101.V04, MTWL0101.V05, or MTWL0101.V06, there is a defect in the boot priority handling of the NVMe M.2 SSD in Slot 3 within the BIOS.
Note:
If you plan to install TOS 7 on the NVMe M.2 SSD in Slot 3 in the future, you still need to refer to Method B to update the BIOS.
If you do not plan to use Slot 3 for TOS 7 installation, you do not need to update the BIOS or adjust the boot order. For temporary solutions, you may use Method A or Method C.
Solutions:
You can choose one of the following three methods that best fits your situation:
Method A: Migrate the system disk or change the slot.
Update:
1.Before updating to TOS 7, go to Storage Manager > Disk in the TOS Control Panel. In the System Disk section, migrate the system disk from the Slot 3 NVMe M.2 SSD to an SSD in another slot, then proceed with the TOS 7 update.
2.Move the system disk to Slot 1 or Slot 2 so that it is no longer installed in Slot 3, then proceed with the system update.
Installation:
When installing the system, select a SATA HDD or SATA SSD as the system disk.
When installing TOS 7 using a TOS 7 USB installer, do not select the NVMe M.2 SSD installed in Slot 3 (the TOS 7 USB installer will be released later).
Method B: Adjust the disk boot order.
Adjusting the BIOS boot order is only a temporary solution. If you replace disks or reinstall the system, you will need to modify it again.
1. Enter the BIOS page.
Install all disks you use. With the device powered off, connect the TNAS to a monitor using an HDMI cable and connect a keyboard. Press the power button, then immediately press Del or Esc repeatedly in short taps until the BIOS interface appears. Do not hold the key down; tap it 1-2 times per second.
2、Disable UTOS Boot First.
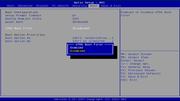
In the BIOS, press the Right Arrow key to go to the Boot page. Press the Down Arrow key to select UTOS Boot First, press Enter, then press the Down Arrow key to select Disabled, and press Enter to confirm.
3、Adjust the boot order.
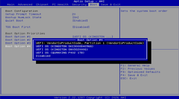
After disabling “UTOS Boot First”, press the ↓ arrow key to select the last Boot Option entry, then press Enter to modify it.
Use the arrow keys to select the USB boot entry (onboard USB boot device), then press Enter to confirm the selection.
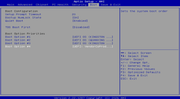
4. Save and exit.
After setting the USB boot device as the last boot option, press F4. When prompted to save and exit, press Enter to confirm. The system will then reboot, and you can proceed with the TOS 7 update.
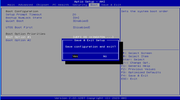
Method C: Update the BIOS Version
After updating the BIOS, the NVMe M.2 SSD in Slot 3 can be used normally. TOS 7 can then be installed, updated, and used without issues.
1.Confirm whether the current BIOS version of your F2-425 Plus or F4-425 Plus is one of the following: V03, V04, V05, or V06. If so, follow the steps below to update the BIOS.
2. Download the latest BIOS file for your model:
F2-425 Plus:F2-425_Plus_BJFX-TWLX-108.zip
F4-425 Plus:F4-425_Plus_BJFX-TWLX-108.zip
3.Prepare a USB drive (32 GB or smaller) and format it as FAT32. Extract the downloaded BJFX-TWLX-108.zip file, and copy all extracted files to the root directory of the USB drive.
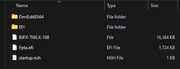
4、Remove all disks from the TNAS, insert the prepared BIOS update USB drive into the TNAS, connect the TNAS to a monitor with an HDMI cable, and connect a USB keyboard. Press the power button, then immediately press Del or Esc repeatedly in short taps until the BIOS interface appears. Do not hold the key down; tap it 1-2 times per second. You can also check whether the BIOS Version on the home page is one of the versions mentioned above.

5、On the BIOS interface, press the → arrow key to go to the Save & Exit tab. Then use the ↓ arrow key to select the BIOS update USB entry, and press Enter to confirm.
If you accidentally select the onboard USB boot entry, the system may boot into the OS installation interface. In this case, restart the device and select the correct BIOS update USB entry again.
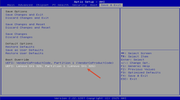
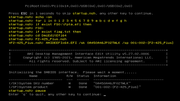
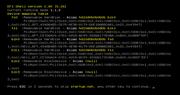
6、When this screen appears, wait for the countdown to complete. The BIOS update will start automatically and takes approximately 1-3 minutes. Do not press any keys during this process. Wait until the message “FPT Operation Successful” appears, indicating a successful update.
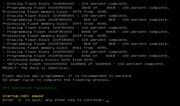
7、After the success message appears, press Enter. The TNAS will reboot automatically. After a few seconds, the TNAS will beep once, indicating that the hardware self-test has passed. When you hear the beep, immediately press Del or Esc repeatedly in short taps until the BIOS interface appears. Then follow Step 5 to select the BIOS update USB device again and press Enter to confirm.
8、After selecting the BIOS update USB drive for the second time, wait for the operation to complete automatically. When finished, the page shown below will appear, indicating that all operations have been completed. You can then remove the BIOS update USB device and update or install TOS 7 normally.