How to Collect Relevant Logs When TNAS Crashes?
Posted: 07 Aug 2024, 09:05
Applicable Versions:
TOS 5.0.xxx, TOS 5.1.xxx ,TOS6
Applicable Models:
TNAS models (except F2-210, F4-210)
Fault Symptoms:
When the TNAS crashes, causing the web page to be inaccessible and the PC unable to find the device, the system report on the TOS web page lacks related logs after rebooting, making it difficult to analyze the cause of the exception.
Fault Reason:
When the TNAS device crashes and reboots, some system-related logs are cleared. To address this, other log collection methods are required to analyze the exception.
Steps for TOS5 Operation:
Step 1: Use tools like Putty to log in to the NAS command line terminal.
Link to guide: https://forum.terra-master.com/cn/viewt ... =87&t=1511
Step 2: Modify the log storage location
2.1. Execute the command: vi /etc/syslog.conf to enter the configuration file editing interface.

2.2. Press the "i" key to enter edit mode, use the arrow keys to move the cursor to /var/log/messages, and delete /var/log, as shown below:

2.3. Press the "ESC" key to exit edit mode, then press "Shift" + ":" together, after the colon “:”, enter "wq", and press "Enter" to save the configuration and exit.
2.4. Execute the command vi /etc/init.d/S01logging to enter the configuration file editing interface.
2.5. Press the "i" key to enter edit mode, use the arrow keys to move the cursor to printf "Starting logging: ", as shown below:

2.6. Press "Enter", when the cursor jumps to the next line, press "Tab" to align the cursor, and then enter:
shell
mv /messages /messages_$(date +"%Y_%m_%d_%H_%M_%s")
as shown below:

2.7. Press the "ESC" key to exit edit mode, then press "Shift" + ":" together, after the colon “:”, enter "wq", and press "Enter" to save the configuration and exit.
Step 3: Check if the log configuration is successful
3.1. After the configuration is successful, restart the NAS, log in via SSH, enter cd /, and then enter ls.

3.2. If "messages" appears, it means the configuration is successfully completed.
Step 4: Log output and sending
4.1. If the system fails, restart the TNAS device and log in to the NAS backend using SSH, execute the command:
shell
mv /messages* /Volume1/public
4.2. Log in to TNAS through SMB or the web, and copy all the "messages" logs in the "public" directory to your computer.
4.3. Send the logs via email to support(at)terra-master.com.
4.4. After receiving the log information, we will analyze the cause and reply to you as soon as possible.
Steps for TOS6 Operation:
1. Log in to the TOS WEB console. In the top navigation bar, select "Support & Help > Debug Mode", then check the box for "Enable System Debug Mode".
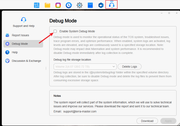
2. When a system failure occurs, restart your TNAS device. After rebooting, go back to "Support & Help > Debug Mode" and click to download the log file.
3. Send the log file via email to support(at)terra-master.com. We will analyze the issue and respond to you as soon as we receive the log file.
TOS 5.0.xxx, TOS 5.1.xxx ,TOS6
Applicable Models:
TNAS models (except F2-210, F4-210)
Fault Symptoms:
When the TNAS crashes, causing the web page to be inaccessible and the PC unable to find the device, the system report on the TOS web page lacks related logs after rebooting, making it difficult to analyze the cause of the exception.
Fault Reason:
When the TNAS device crashes and reboots, some system-related logs are cleared. To address this, other log collection methods are required to analyze the exception.
Steps for TOS5 Operation:
Step 1: Use tools like Putty to log in to the NAS command line terminal.
Link to guide: https://forum.terra-master.com/cn/viewt ... =87&t=1511
Step 2: Modify the log storage location
2.1. Execute the command: vi /etc/syslog.conf to enter the configuration file editing interface.
2.2. Press the "i" key to enter edit mode, use the arrow keys to move the cursor to /var/log/messages, and delete /var/log, as shown below:
2.3. Press the "ESC" key to exit edit mode, then press "Shift" + ":" together, after the colon “:”, enter "wq", and press "Enter" to save the configuration and exit.
2.4. Execute the command vi /etc/init.d/S01logging to enter the configuration file editing interface.
2.5. Press the "i" key to enter edit mode, use the arrow keys to move the cursor to printf "Starting logging: ", as shown below:
2.6. Press "Enter", when the cursor jumps to the next line, press "Tab" to align the cursor, and then enter:
shell
mv /messages /messages_$(date +"%Y_%m_%d_%H_%M_%s")
as shown below:
2.7. Press the "ESC" key to exit edit mode, then press "Shift" + ":" together, after the colon “:”, enter "wq", and press "Enter" to save the configuration and exit.
Step 3: Check if the log configuration is successful
3.1. After the configuration is successful, restart the NAS, log in via SSH, enter cd /, and then enter ls.
3.2. If "messages" appears, it means the configuration is successfully completed.
Step 4: Log output and sending
4.1. If the system fails, restart the TNAS device and log in to the NAS backend using SSH, execute the command:
shell
mv /messages* /Volume1/public
4.2. Log in to TNAS through SMB or the web, and copy all the "messages" logs in the "public" directory to your computer.
4.3. Send the logs via email to support(at)terra-master.com.
4.4. After receiving the log information, we will analyze the cause and reply to you as soon as possible.
Steps for TOS6 Operation:
1. Log in to the TOS WEB console. In the top navigation bar, select "Support & Help > Debug Mode", then check the box for "Enable System Debug Mode".
2. When a system failure occurs, restart your TNAS device. After rebooting, go back to "Support & Help > Debug Mode" and click to download the log file.
3. Send the log file via email to support(at)terra-master.com. We will analyze the issue and respond to you as soon as we receive the log file.
