How to Properly Install and Use TOS 7 on the 424 Series TNAS


Re: How to Properly Install and Use TOS 7 on the 424 Series TNAS
Well, my F4-424 bios is v06 and I have no problem updating now to the latest 1169, bios is mainly for the hardware not the software, so if TOS 7 works with v06 there is really no importance to upgrade it to v08.
F4-424
Two D4-320
Two D4-320
-
FullSystemWhat

- Posts: 2
- Joined: 22 Sep 2026, 00:49

Re: How to Properly Install and Use TOS 7 on the 424 Series TNAS
Need help.
I updated from TOS 6.0.794 with BIOS MADN0101.V06 on an 128GB SATA 3.1 SSD to TOS 7.0.0747. Everything seemed to work well at first. After the installation I opened the web GUI and was asked about sharing permissions. I chose to reapply permissions automatically.
Now, after hours of my 424 working and 2 manual restarts, I can't access the GUI any more (502 error) and diagnostics over an SSH connection show that the small system partition (7.5GB) is 100% full. Idk why it's so small. I never considered this to be a problem, since the drive is 128GB. I'd love to be able to increase the partition size or delete something non-essential, but most ssh commands concerning file management don't seem to work, since I'm missing permissions despite being root user?
What can I do from here that doesn't break everything?
I've been trying to troubleshoot with AI and got the recommendation to post these info:
If you need more info I'm happy to provide it.
I updated from TOS 6.0.794 with BIOS MADN0101.V06 on an 128GB SATA 3.1 SSD to TOS 7.0.0747. Everything seemed to work well at first. After the installation I opened the web GUI and was asked about sharing permissions. I chose to reapply permissions automatically.
Now, after hours of my 424 working and 2 manual restarts, I can't access the GUI any more (502 error) and diagnostics over an SSH connection show that the small system partition (7.5GB) is 100% full. Idk why it's so small. I never considered this to be a problem, since the drive is 128GB. I'd love to be able to increase the partition size or delete something non-essential, but most ssh commands concerning file management don't seem to work, since I'm missing permissions despite being root user?
What can I do from here that doesn't break everything?
I've been trying to troubleshoot with AI and got the recommendation to post these info:
Code: Select all
Device: TerraMaster F4-424
System update: TOS 6.0.794 → TOS 7.0.0747
BIOS version: MADN0101.V06
System disk: HDD3, SATA SSD, 128 GB (TS128GSSD340), ~24,500 hours in use
Additional storage: NVMe Disk1 (CT1000P3PSSD8, 1 TB) used as Hyper Cache (Balance mode, Single Disk, applied to Volume 1)
Volumes: Volume1 (3.7 TB, 53% used), Volume2 (3.7 TB, 78% used)

ISSUE SUMMARY:

1. Update process: Update was started manually via Control Panel. During the process, a prompt appeared about "Sharing" migration, and I chose the option that indicated it would take more time (rather than the manual option).

2. First symptom: After logging in post-update, the web GUI showed "Failed to retrieve data" and the menu/app list was empty. File sharing (SMB) and Jellyfin continued to work normally throughout.

3. Second symptom: Shortly after, login attempts returned "User does not exist."

4. After a reboot: The web GUI now shows a raw "502 Bad Gateway / nginx/1.18.0 (Ubuntu)" error at /tos/#/desktop, and the API endpoint /v2/Initialise/IsInitialise also returns HTTP 502.

5. SSH diagnosis (port 9222, confirmed working):
   - nginx.service: active (running), stable for 7+ hours
   - TOSDaemon.service: continuously crash-looping (activating/auto-restart, exit-code, status=1/FAILURE), restart counter over 8600
   - TOSDaemon log shows: "failed to initialize database, got error failed to connect to `user=terramaster database=tos`: 127.0.0.1:5032 (127.0.0.1): dial error: dial tcp 127.0.0.1:5032: connect: connection refused"
   - [email protected]: failed (Result: protocol)
   - PostgreSQL log (/var/log/postgresql/postgresql-13-main.log) shows: "FATAL: could not write lock file 'postmaster.pid': No space left on device"

6. Root cause identified: Root partition /dev/md9 (ext4, mounted rw,noatime,nodiratime) is at 100% usage, 0 bytes available (7.5 GB total size). Breakdown of usage: /usr ~2.3 GB, /var ~519 MB, /boot ~87 MB, /swapfile 4 GB (pre-existing, legitimate).

7. Attempted fix — clearing apt cache/lists to free space:
   - `sudo apt clean` fails with "Permission denied" on /var/cache/apt/archives/partial, /var/lib/apt/lists/lock, pkgcache.bin, srcpkgcache.bin
   - `sudo rm` on files in /var/lib/apt/lists/* and /var/cache/apt/archives/*.deb fails with "Permission denied" even when run as root (confirmed via `sudo whoami` = root, full capability set confirmed via /proc/self/status, no container/namespace isolation per /proc/1/cgroup)
   - `sudo truncate -s 0` on the same files also fails with "Permission denied"
   - No immutable attribute set (lsattr shows only the normal 'e' extent flag)
   - No AppArmor denials found in dmesg; aa-status/apparmor checks inconclusive
   - No process holds an open lock on the affected files (lsof/fuser show nothing relevant)
   - Filesystem remains mounted rw throughout; no ext4 errors or read-only remounts found in dmesg
   - Creating a NEW file in the same directory (/var/cache/apt/testfile) succeeds without sudo, but deleting/truncating the EXISTING cache files (pkgcache.bin, srcpkgcache.bin, the .deb package) consistently fails with Permission denied, even as root

Re: How to Properly Install and Use TOS 7 on the 424 Series TNAS
Bonsoir,
J'ai deux questions :
1) Votre disque de 128 GB est-il uniquement destiné au système ou contient-il d'autres données ?
2) Avez vous sauvegardé votre "configuration" et si oui, avec quelles versions de TOS ?
De fait, lorsque j'ai installé TOS 7, tout mon système à planté et mon f4-424 est devenu totalement inaccessible. J'avais sauvegardé ma configuration (fichier xxx".bin").
J'ai alors effectuer une opération assez radicale : un de mes deux disques "NVME" était uniquement dédié au système. J'ai donc enlevé tous les disques de mon NAS en répérant bien les emplacements de chaque disque. J'ai ensuite effacé le petit disque dédié au système depuis un ordinateur windows (formatage...). J'ai ensuite remis ce seul disque formaté dans son emplacement dans mon NAS et j'ai allumé mon F4-424. Depuis l'application "Tnas" de terramaster, j'ai initialiser mon NAS comme s'il était neuf avec le compte "admin" par défaut.
Une fois initialisé, j'ai upgradé ma version de TOS jusqu'à celle où j'avais fait ma sauvegarde. J'ai alors lancé ma restauration de la configuration.
Une fois cette étape faite, j'ai arrêté proprement mon NAS, j'ai remis tous mes autres disques dans leurs emplacements et j'ai démarré le NAS.
Le miracle s'est produit : j'ai retrouvé toutes mes données stockées, mes partages, mes utilisateurs, etc., etc. (20 TO ! si j'avais dû tout recopier , cela aurait pris une éternité...)
Le bilan : depuis cette opération, tous les autres upgrades se sont déroulés sans aucun souci. Le TOS 7 est propre et la partition "système" est plus grande (choix à l'initialisation...).
Ma chance a été d'avoir fait la sauvegarde de ma configuration (deuxième onglet du menu "système") avant et aussi d'avoir un petit disque dédié au système sans données sensibles.
J'avoue que j'ai eu peur pendant cette opération de perdre tout ce que j'avais sur mes autres disques à la fin. Mais maintenant, je suis enchanté de l'avoir fait. Non seulement je n'ai rien perdu, mais mon système est propre. Mais je laisse les spécialistes de Terramaster vous répondre. Je ne suis qu'un utilisateur et je suis beaucoup plus à l'aise avec les NAS des autres marques, que je connais depuis bien plus longtemps.
J'ai deux questions :
1) Votre disque de 128 GB est-il uniquement destiné au système ou contient-il d'autres données ?
2) Avez vous sauvegardé votre "configuration" et si oui, avec quelles versions de TOS ?
De fait, lorsque j'ai installé TOS 7, tout mon système à planté et mon f4-424 est devenu totalement inaccessible. J'avais sauvegardé ma configuration (fichier xxx".bin").
J'ai alors effectuer une opération assez radicale : un de mes deux disques "NVME" était uniquement dédié au système. J'ai donc enlevé tous les disques de mon NAS en répérant bien les emplacements de chaque disque. J'ai ensuite effacé le petit disque dédié au système depuis un ordinateur windows (formatage...). J'ai ensuite remis ce seul disque formaté dans son emplacement dans mon NAS et j'ai allumé mon F4-424. Depuis l'application "Tnas" de terramaster, j'ai initialiser mon NAS comme s'il était neuf avec le compte "admin" par défaut.
Une fois initialisé, j'ai upgradé ma version de TOS jusqu'à celle où j'avais fait ma sauvegarde. J'ai alors lancé ma restauration de la configuration.
Une fois cette étape faite, j'ai arrêté proprement mon NAS, j'ai remis tous mes autres disques dans leurs emplacements et j'ai démarré le NAS.
Le miracle s'est produit : j'ai retrouvé toutes mes données stockées, mes partages, mes utilisateurs, etc., etc. (20 TO ! si j'avais dû tout recopier , cela aurait pris une éternité...)
Le bilan : depuis cette opération, tous les autres upgrades se sont déroulés sans aucun souci. Le TOS 7 est propre et la partition "système" est plus grande (choix à l'initialisation...).
Ma chance a été d'avoir fait la sauvegarde de ma configuration (deuxième onglet du menu "système") avant et aussi d'avoir un petit disque dédié au système sans données sensibles.
J'avoue que j'ai eu peur pendant cette opération de perdre tout ce que j'avais sur mes autres disques à la fin. Mais maintenant, je suis enchanté de l'avoir fait. Non seulement je n'ai rien perdu, mais mon système est propre. Mais je laisse les spécialistes de Terramaster vous répondre. Je ne suis qu'un utilisateur et je suis beaucoup plus à l'aise avec les NAS des autres marques, que je connais depuis bien plus longtemps.
 F4-424
 -
FullSystemWhat
- Posts: 2
- Joined: 22 Sep 2026, 00:49
Re: How to Properly Install and Use TOS 7 on the 424 Series TNAS
Hello,
my 128GB disc is for System files only. I'm guessing it was partitioned into a system partition (7.5GB) and other files (all the rest). On the rest there should be Docker files and miscellaneous other files. I backed up the Docker files from DockerAppsData. All my personal files and Media are on other discs.
If push comes to shove I'll disconnect these and try a whole reinstall on the SSD. I'd probably switch away from TOS though, since my experience hasn't been the best so far.
Thank you for your input.
my 128GB disc is for System files only. I'm guessing it was partitioned into a system partition (7.5GB) and other files (all the rest). On the rest there should be Docker files and miscellaneous other files. I backed up the Docker files from DockerAppsData. All my personal files and Media are on other discs.
If push comes to shove I'll disconnect these and try a whole reinstall on the SSD. I'd probably switch away from TOS though, since my experience hasn't been the best so far.
Thank you for your input.
Re: How to Properly Install and Use TOS 7 on the 424 Series TNAS
Personnellement, je voulais rester sous "TOS" essentiellement pour ne pas perdre mon énorme volume de données. Je n'utilise pas "docker" et uniquement les applications certifiées "terramaster". Ce NAS sert principalement de complément en stockage de vidéo (en association avec Kodi et une base MariaDB centralisée sur un NAS QNAPS). La principale application que j'utilise, en complément de mes besoins en stockage, est surveillance manager, un peu plus rudimentaire que surveillance Station de Synology mais pour l'instant sans besoin de "licences" onéreuses supplémentaires (j'ai cinq caméras configurées sur le NAS Terramaster en enregistrement et surveillance).
Bref, que du basique et tout est estampillé par la marque. Donc, quand le NAS a connu son problème, mon principal souci était de ne pas perdre mes données. Les disques étant montés en "JBOD" avec une sauvegarde sur un autre NAS (un volume 2 X 8To et un de 2 X 4TO) , J'ai tout fait dans l'optique de retrouver mes données à la fin de ma tentative (environ 23 To !). Autant dire que j'ai été très satisfait du résultat de mon "bricolage".
J'en ai profité dans la foulée pour passer le BIOS en "MADN0101.V08", vu que le fichier était fourni ici.
Depuis, avec les "updates" actuels toutes les semaines, j'ai upgradé trois fois ma version "propre" et je n'ai plus eu aucun souci, si ce n'est des détails mineurs. Je garde donc toute ma confiance dans les équipes de TERRAMASTER et dans leur TOS. Ils connaissent bien mieux les capacités du matériel que ceux qui mettent à disposition d'autres systèmes, selon moi...
Bon courage à vous et j'espère que vous résoudrez votre souci. D'après ce que vous me décrivez, vous pourriez vous aussi repartir d'une version propre sans perdre vos données. De plus, vous êtes mieux loti que moi : je ne pouvais plus, dans mon cas, accéder au TOS via SSH qui était de toutes façons désactivé sur ma machine. Je n'active SSH que temporairement...
Bref, que du basique et tout est estampillé par la marque. Donc, quand le NAS a connu son problème, mon principal souci était de ne pas perdre mes données. Les disques étant montés en "JBOD" avec une sauvegarde sur un autre NAS (un volume 2 X 8To et un de 2 X 4TO) , J'ai tout fait dans l'optique de retrouver mes données à la fin de ma tentative (environ 23 To !). Autant dire que j'ai été très satisfait du résultat de mon "bricolage".
J'en ai profité dans la foulée pour passer le BIOS en "MADN0101.V08", vu que le fichier était fourni ici.
Depuis, avec les "updates" actuels toutes les semaines, j'ai upgradé trois fois ma version "propre" et je n'ai plus eu aucun souci, si ce n'est des détails mineurs. Je garde donc toute ma confiance dans les équipes de TERRAMASTER et dans leur TOS. Ils connaissent bien mieux les capacités du matériel que ceux qui mettent à disposition d'autres systèmes, selon moi...
Bon courage à vous et j'espère que vous résoudrez votre souci. D'après ce que vous me décrivez, vous pourriez vous aussi repartir d'une version propre sans perdre vos données. De plus, vous êtes mieux loti que moi : je ne pouvais plus, dans mon cas, accéder au TOS via SSH qui était de toutes façons désactivé sur ma machine. Je n'active SSH que temporairement...
F4-424 Re: How to Properly Install and Use TOS 7 on the 424 Series TNAS
Précision : lors de l'installation "propre", j'ai eu le choix de la capacité de la partition réservée au système. Soit rester à l'ancienne norme, soit passer à la nouvelle capacité... J'ai évidemment choisi la nouvelle.
F4-424 
Re: How to Properly Install and Use TOS 7 on the 424 Series TNAS
Based on the issue you described, it’s not yet possible to determine why the system partition is full. You can try using SSH to check if there are any obvious non-system files taking up space.FullSystemWhat wrote: ↑22 Sep 2026, 05:04 Hello,
my 128GB disc is for System files only. I'm guessing it was partitioned into a system partition (7.5GB) and other files (all the rest). On the rest there should be Docker files and miscellaneous other files. I backed up the Docker files from DockerAppsData. All my personal files and Media are on other discs.
If push comes to shove I'll disconnect these and try a whole reinstall on the SSD. I'd probably switch away from TOS though, since my experience hasn't been the best so far.
Thank you for your input.
There is no way to directly expand the system partition; modifying the partition will format the data. You may want to back up your data, then perform a factory reset, reinstall TOS7, select the 128GB target disk as the system partition, and choose a “32GB” system partition (changing the size of the system partition will format the disk).
To contact our team, please send email to following addresses, remember to replace (at) with @:
Technical team: support(at)terra-master.com (for technical support)
Service team: service(at)terra-master.com (for purchasing, return, replacement, RMA service)
Technical team: support(at)terra-master.com (for technical support)
Service team: service(at)terra-master.com (for purchasing, return, replacement, RMA service)


Re: How to Properly Install and Use TOS 7 on the 424 Series TNAS
For some reason, I used update method D. However, after updating the BIOS from version MADN0101.V06 to MADN0101.V08, the system stopped displaying the model name (F4-424 Pro). Instead of the model name, a dash appears in the system properties, although the system identifier (0cdaa88e7432) is still shown. Without the model identification, TNAS reports no available updates, and attempting to install TOS 7 manually triggers an incompatibility error. How can I fix this issue where the system fails to correctly identify the TNAS model?
Re: How to Properly Install and Use TOS 7 on the 424 Series TNAS
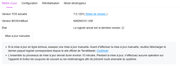
Suite à votre commentaire, j'ai vérifié moi aussi sur mon NAS car j'ai installé moi aussi le Bios V8 mais sur un F4-424. Effectivement, le nom du modèle se retrouve vide dans les informations système (voir la copie d'écran ci-dessous). Par contre, cela ne bloque pas les nouvelles mise à jour de TOS, dans mon cas. Ceci dit, ma migration de TOS V6 à TOS V7 a été faite avant mon passage en Bios V8... Mais je confirme votre constatation par l'image : dans les informations système, le modèle reste à "---". Je ne l'avais personnellement pas remarqué avant votre message.
 F4-424

Re: How to Properly Install and Use TOS 7 on the 424 Series TNAS
The model shows as "---" because Steps 7 and 8 were skipped during the update. The first boot flashes the BIOS, while the second USB boot automatically writes the model information.
To fix it:
1. Power off, remove all drives, insert the BIOS update USB, and connect a monitor and keyboard.
2. Power on and tap Del or Esc to enter the BIOS.
3. Go to Save & Exit, select the BIOS update USB device (the UEFI entry), and press Enter.
4. Wait for the script to finish writing the model info, then remove the USB.
5. Reinstall your drives and boot into TOS. The model will now display correctly.
Please try these steps and let us know how it goes. Looking forward to your feedback!
To contact our team, please send email to following addresses, remember to replace (at) with @
Technical team: support(at)terra-master.com(for technical support)
Service team: service(at)terra-master.com(for purchasing, return, replacement, RMA service)
Technical team: support(at)terra-master.com(for technical support)
Service team: service(at)terra-master.com(for purchasing, return, replacement, RMA service)