How to repair a corrupted file system?
Posted: 25 Oct 2021, 17:17
Troubleshooting
Applicable models: All TNAS models
Applicable TOS version: TOS 4.2, TOS 5, TOS 6
In a few cases, the file system is at risk of corruption, such as abnormal shutdown, power failure, and hard disk failure. If this unfortunate thing happens, TOS may fail to load, storage pool and volume may fail to load, but your data may still have a chance to be rescued, please refer to the following methods to repair the faulty file system.
Disclaimer:
For the safety of your data, it is recommended that the repair needs to be operated by professionals. During the repair process, misoperation, power failure, and collision may cause data loss due to repair failure, your data still has a chance to be completely destroyed. If your data is exceptionally important, it is recommended that you rescue your data through a professional data recovery service. If you decide to carry out the repair operation, you need to bear all risks on your own.
If you have another storage space that is large enough (larger than the amount of data on the problematic volume), we recommend exporting the data to that destination before attempting a repair. (Please use a dedicated SSH/Telnet tool such as PuTTY or FinalShell, and prevent your computer from entering sleep mode to avoid connection interruptions.)
Instruction
1. Log in your TNAS with SSH. How to log in your TNAS with SSH terminal?
2. Execute the following command to view the system log:
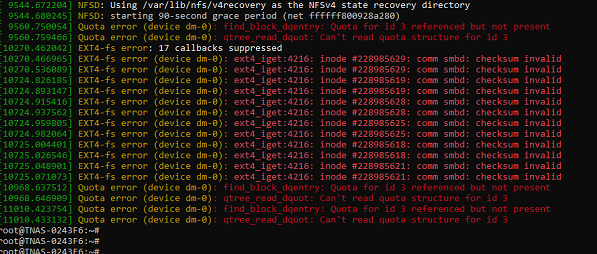
If you find an obvious red font mark or a message with the words like "group descriptors corrupted!","Ext4-fs error", as shown in the figure below, it means that there must be an abnormality in the EXT4 file system, please use the "General Repair Method of Ext4 File System".
(If you do not find similar errors, it does not necessarily mean that there are no errors at all. It may be that the error was not triggered during this startup)

If you find an obvious red font mark or a message with the words "Btrfs error", as shown in the figure below, it means that there must be an abnormality in the BTRFS file system, please use the "General BTRFS file system repair method".
(If you do not find similar errors, it does not necessarily mean that there are no errors at all. It may be that the error was not triggered during this startup)

The general repair method of EXT4 file system:
Note: For step 3-step 7, if your TNAS has used the early TOS 4.0 or even TOS 3.x. Since LVM management was not adopted at that time, there may not be a directory like "/dev/mapper/vg0-lv0". Please use "/dev/md0" instead.
1. Before proceeding with the repair, please disable the SSD cache (if it has been enabled). If the cache is not enabled, please skip this step. Then, depending on your TOS system version, execute the following commands to unmount the current file system (volume).
TOS4.x:
TOS5.x / TOS6.x:
2. If the prompt "Target is busy", Please cancel the occupancy of the volume by the service processes, disable the SSD cache (if no SSD cache, please ignore it), and then execute the command above again.
If the root user is automatically logged out, please log in to SSH again and switch to the root user, then go back to step 1.
(At TOS 5 it should be "/Volume1" instead of "/mnt/md0")
3. Execute the repair instruction and wait for the repair to complete:
4. After the repair is complete, execute the following command to remount the file system:
5. Refresh the TOS login page and log in again.
6. If the abnormality still exists, you can repeat steps 1 and 2 and execute follow:
After the repair is complete, repeat steps 4 and 5.
7. If the abnormality still exists, you can repeat steps 1 and 2 and execute the mandatory repair instruction (risky! Please be cautious):
After the repair is complete, repeat steps 4 and 5.
The conventional repair method of BTRFS file system:
Note: For step 3-step 4, if your TNAS has used the early TOS 4.0 or even TOS 3.x. Since LVM management was not adopted at that time, there may not be a directory like "/dev/mapper/vg0-lv0". Please use "/dev/md0" instead.
Note: BTRFS is not perfect in 210 series model who uses an earlier linux kernel versions.
If your device model is F2-210 or F4-210, We recommend that you back up your data and then rebuild your BTRFS volumes to more stable EXT4 volumes.
1. Before proceeding with the repair, please disable the SSD cache (if it has been enabled). If the cache is not enabled, please skip this step. Then, depending on your TOS system version, execute the following commands to unmount the current file system (volume).
TOS4.x:
TOS5.x :
TOS6.x
Whether you are using the ext4 or btrfs file system, if the volume to be unmounted is not the first volume in the file system, you must modify the default command "umount /Volume1" by replacing "/Volume1" with the corresponding volume name. For example, to unmount the second volume, the command should be "umount /Volume2".
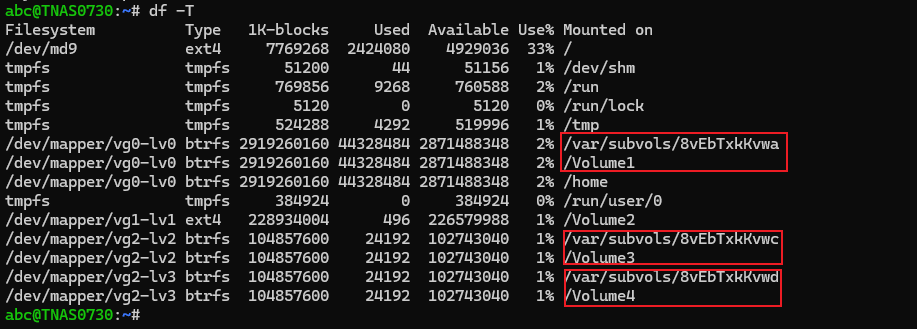
Additionally, in the btrfs file system, when executing commands such as "umount /var/subvols/8vEbTxkKvwa" for subvolumes corresponding to non-first volumes, the command must also be adjusted. For instance, change it to "umount /var/subvols/8vEbTxkKvw?", where the "?" should be replaced with the corresponding subvolume name. All such names can be confirmed using the "df -T" command. As shown in the figure below:
2. If the prompt "Target is busy", Please cancel the occupancy of the volume by the service processes, disable the SSD cache (if no SSD cache, please ignore it), and then execute the command above again. If the root user is automatically logged out, please log in to SSH again and switch to the root user, then go back to step 1.
(At TOS 5 it should be "/Volume1" instead of "/mnt/md0")
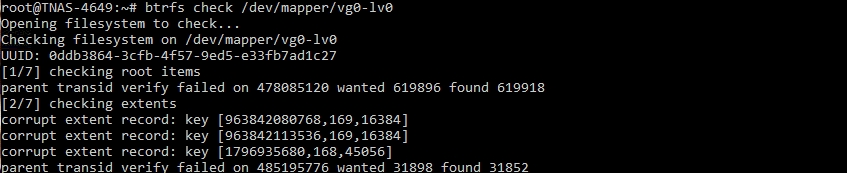
3. Execute the following command to detect the BTRFS file system:Execute the following command to check the BTRFS file system. If the check takes a long time or an obvious error message is found, please wait patiently for the check to complete
4. After the detection is completed, execute the following instructions to restore the file system: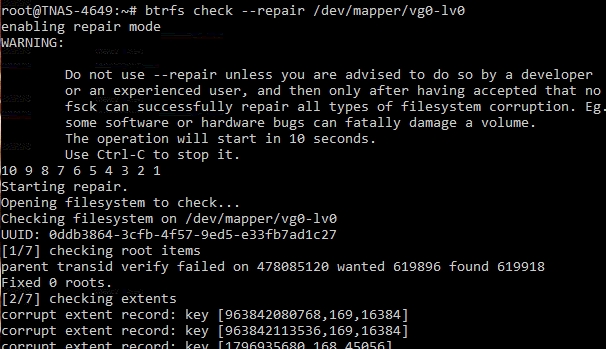
5. As shown in the figure above, if it prompts "10 9 8 7 6 5 4 3 2 1", it means that the probability of file system recovery is very high. Just wait for the end of the recovery process and execute the following command to remount the file system:
6. Refresh the TOS login page and log in again.
Applicable models: All TNAS models
Applicable TOS version: TOS 4.2, TOS 5, TOS 6
In a few cases, the file system is at risk of corruption, such as abnormal shutdown, power failure, and hard disk failure. If this unfortunate thing happens, TOS may fail to load, storage pool and volume may fail to load, but your data may still have a chance to be rescued, please refer to the following methods to repair the faulty file system.
Disclaimer:
For the safety of your data, it is recommended that the repair needs to be operated by professionals. During the repair process, misoperation, power failure, and collision may cause data loss due to repair failure, your data still has a chance to be completely destroyed. If your data is exceptionally important, it is recommended that you rescue your data through a professional data recovery service. If you decide to carry out the repair operation, you need to bear all risks on your own.
If you have another storage space that is large enough (larger than the amount of data on the problematic volume), we recommend exporting the data to that destination before attempting a repair. (Please use a dedicated SSH/Telnet tool such as PuTTY or FinalShell, and prevent your computer from entering sleep mode to avoid connection interruptions.)
Code: Select all
btrfs restore /dev/mapper/vg0-lv0 [destination directory]
1. Log in your TNAS with SSH. How to log in your TNAS with SSH terminal?
2. Execute the following command to view the system log:
Code: Select all
dmesg(If you do not find similar errors, it does not necessarily mean that there are no errors at all. It may be that the error was not triggered during this startup)
If you find an obvious red font mark or a message with the words "Btrfs error", as shown in the figure below, it means that there must be an abnormality in the BTRFS file system, please use the "General BTRFS file system repair method".
(If you do not find similar errors, it does not necessarily mean that there are no errors at all. It may be that the error was not triggered during this startup)
The general repair method of EXT4 file system:
Note: For step 3-step 7, if your TNAS has used the early TOS 4.0 or even TOS 3.x. Since LVM management was not adopted at that time, there may not be a directory like "/dev/mapper/vg0-lv0". Please use "/dev/md0" instead.
1. Before proceeding with the repair, please disable the SSD cache (if it has been enabled). If the cache is not enabled, please skip this step. Then, depending on your TOS system version, execute the following commands to unmount the current file system (volume).
TOS4.x:
Code: Select all
cd /
umount  /mnt/md0
umount /homeCode: Select all
cd /
umount  /mnt/md0
umount /homeCode: Select all
fuser -mk /mnt/md0(At TOS 5 it should be "/Volume1" instead of "/mnt/md0")
3. Execute the repair instruction and wait for the repair to complete:
Code: Select all
e2fsck -p /dev/mapper/vg0-lv0Code: Select all
/etc/tos/scripts/mntdata6. If the abnormality still exists, you can repeat steps 1 and 2 and execute follow:
Code: Select all
e2fsck -b 32768 /dev/mapper/vg0-lv0 -y7. If the abnormality still exists, you can repeat steps 1 and 2 and execute the mandatory repair instruction (risky! Please be cautious):
Code: Select all
e2fsck -f /dev/mapper/vg0-lv0 -yThe conventional repair method of BTRFS file system:
Note: For step 3-step 4, if your TNAS has used the early TOS 4.0 or even TOS 3.x. Since LVM management was not adopted at that time, there may not be a directory like "/dev/mapper/vg0-lv0". Please use "/dev/md0" instead.
Note: BTRFS is not perfect in 210 series model who uses an earlier linux kernel versions.
If your device model is F2-210 or F4-210, We recommend that you back up your data and then rebuild your BTRFS volumes to more stable EXT4 volumes.
1. Before proceeding with the repair, please disable the SSD cache (if it has been enabled). If the cache is not enabled, please skip this step. Then, depending on your TOS system version, execute the following commands to unmount the current file system (volume).
TOS4.x:
Code: Select all
cd /
umount  /mnt/md0
umount /homeCode: Select all
cd /
umount  /mnt/md0
umount /homeCode: Select all
cd /
umount /Volume1
umount /var/subvols/8vEbTxkKvwa
umount /homeAdditionally, in the btrfs file system, when executing commands such as "umount /var/subvols/8vEbTxkKvwa" for subvolumes corresponding to non-first volumes, the command must also be adjusted. For instance, change it to "umount /var/subvols/8vEbTxkKvw?", where the "?" should be replaced with the corresponding subvolume name. All such names can be confirmed using the "df -T" command. As shown in the figure below:
2. If the prompt "Target is busy", Please cancel the occupancy of the volume by the service processes, disable the SSD cache (if no SSD cache, please ignore it), and then execute the command above again.
Code: Select all
fuser -mk /mnt/md0(At TOS 5 it should be "/Volume1" instead of "/mnt/md0")
3. Execute the following command to detect the BTRFS file system:
Code: Select all
btrfs check /dev/mapper/vg0-lv04. After the detection is completed, execute the following instructions to restore the file system:
Code: Select all
btrfs check --repair /dev/mapper/vg0-lv05. As shown in the figure above, if it prompts "10 9 8 7 6 5 4 3 2 1", it means that the probability of file system recovery is very high. Just wait for the end of the recovery process and execute the following command to remount the file system:
Code: Select all
/etc/tos/scripts/mntdata