Introduction and Usage Guide for the Network Bridge
Posted: 02 Aug 2026, 22:34
Applicable Version:
TOS 7
What is Network Bridging?
The Network Bridge feature enables the consolidation of multiple physical network interfaces on the NAS into a single logical network, essentially using the NAS as a virtual switch. Devices plugged into any of those ports will be on the same LAN, and can talk to the router and reach the internet directly.
How to Create a Network Bridge?
1. Enable Bridging
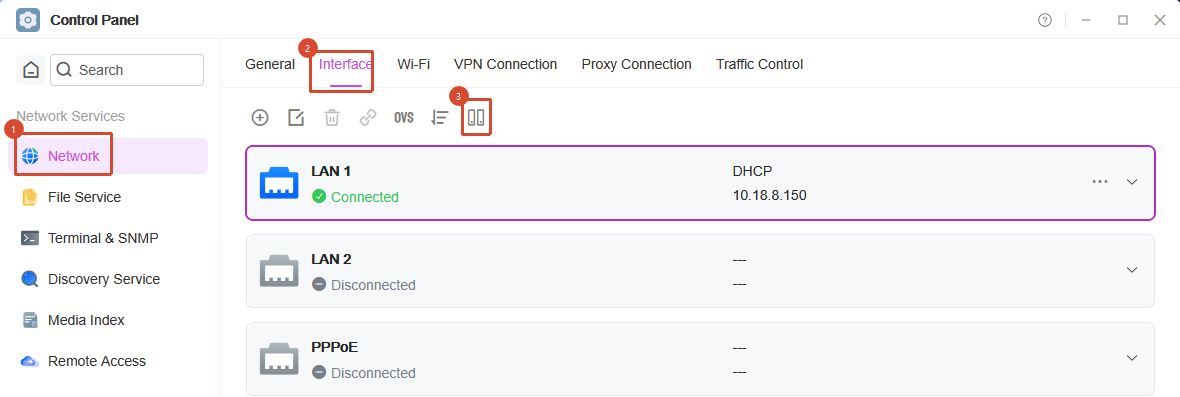
Log in to the TOS management interface, go to [Control Panel] → [Network] → [Interfaces], and click "Create Bridge" to open the creation wizard.
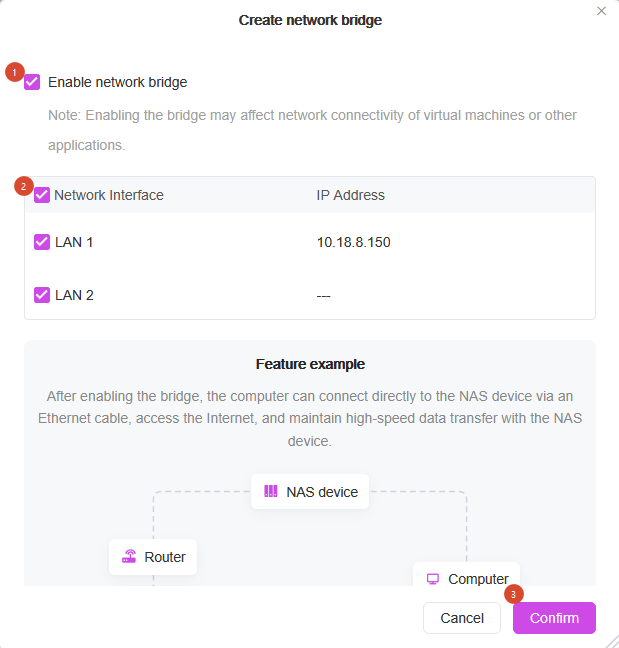
On the wizard, check "Enable Network Bridging" and select two or more network interfaces to bridge (e.g., LAN1, LAN2, and the Thunderbolt interface).
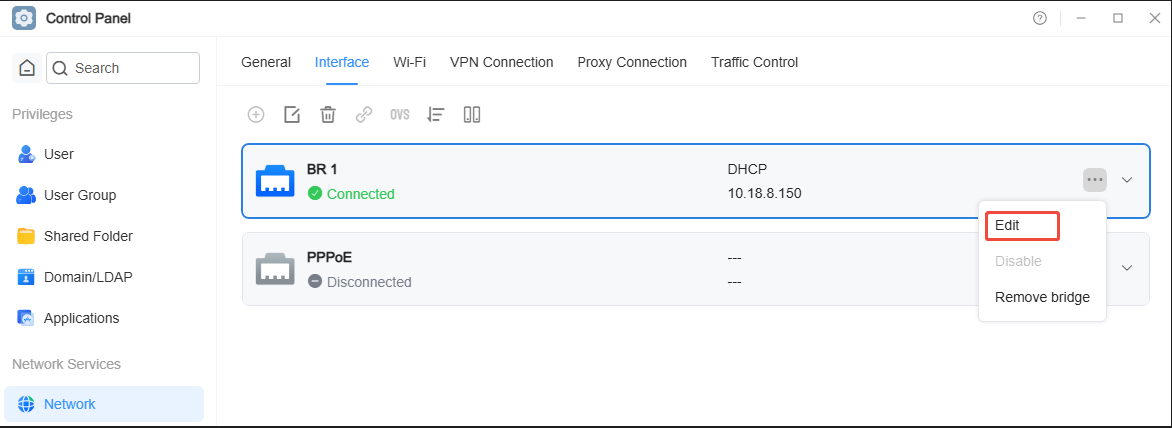
After successful creation, the original network interfaces will disappear, and the system will automatically generate a virtual network card starting with BR.

Note: After you create the network bridge, the NAS's IP address may have changed. It is recommended that you use the TNAS PC desktop application to obtain the correct IP address again and log back into TOS.
2. Configure the IP Address of the Bridged Network Card
The system automatically obtains an IP address via DHCP by default.
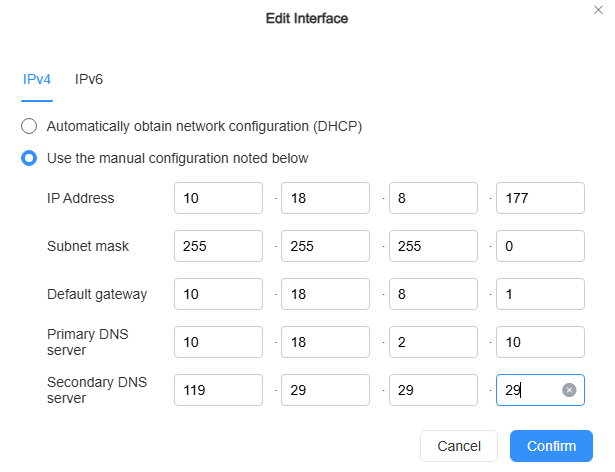
You can manually set the IP address, subnet mask, default gateway, and DNS. Just make sure the IP address is in the same subnet as your router.
3. Configure the Computer's Network
Using an Ethernet cable, connect the RJ45 port of your computer to a bridged network port on the NAS. Set your computer's network to DHCP — it'll automatically get an IP in the same subnet as the NAS.
Manual configuration of the computer's IP address is also permitted — just be sure the computer and NAS are on the same LAN, and that the subnet mask, gateway, and DNS settings match the NAS.
4. Verify Connectivity
After completing the steps above, your computer should have both internet access and a high‑speed connection to the NAS
How to Remove a Network Bridge?
Go to the Interfaces page, choose the bridge you want to remove, then click "Delete" or "Remove Bridge".
After the bridge is removed, the virtual network card starting with BR will disappear, and the system will automatically restore to the default state.
Note: After you remove the network bridge, the NAS's IP address may have changed. It is recommended that you use the TNAS PC desktop application to obtain the correct IP address again and log back into TOS.
Note!
It is forbidden to connect the two bridged network interfaces to the same switch or router, as this may cause a network loop, leading to a broadcast storm and network failure.
TOS 7
What is Network Bridging?
The Network Bridge feature enables the consolidation of multiple physical network interfaces on the NAS into a single logical network, essentially using the NAS as a virtual switch. Devices plugged into any of those ports will be on the same LAN, and can talk to the router and reach the internet directly.
How to Create a Network Bridge?
1. Enable Bridging
Log in to the TOS management interface, go to [Control Panel] → [Network] → [Interfaces], and click "Create Bridge" to open the creation wizard.
On the wizard, check "Enable Network Bridging" and select two or more network interfaces to bridge (e.g., LAN1, LAN2, and the Thunderbolt interface).
After successful creation, the original network interfaces will disappear, and the system will automatically generate a virtual network card starting with BR.
Note: After you create the network bridge, the NAS's IP address may have changed. It is recommended that you use the TNAS PC desktop application to obtain the correct IP address again and log back into TOS.
2. Configure the IP Address of the Bridged Network Card
The system automatically obtains an IP address via DHCP by default.
You can manually set the IP address, subnet mask, default gateway, and DNS. Just make sure the IP address is in the same subnet as your router.
3. Configure the Computer's Network
Using an Ethernet cable, connect the RJ45 port of your computer to a bridged network port on the NAS. Set your computer's network to DHCP — it'll automatically get an IP in the same subnet as the NAS.
Manual configuration of the computer's IP address is also permitted — just be sure the computer and NAS are on the same LAN, and that the subnet mask, gateway, and DNS settings match the NAS.
4. Verify Connectivity
After completing the steps above, your computer should have both internet access and a high‑speed connection to the NAS
How to Remove a Network Bridge?
Go to the Interfaces page, choose the bridge you want to remove, then click "Delete" or "Remove Bridge".
After the bridge is removed, the virtual network card starting with BR will disappear, and the system will automatically restore to the default state.
Note: After you remove the network bridge, the NAS's IP address may have changed. It is recommended that you use the TNAS PC desktop application to obtain the correct IP address again and log back into TOS.
Note!
It is forbidden to connect the two bridged network interfaces to the same switch or router, as this may cause a network loop, leading to a broadcast storm and network failure.
 What about separate Vlans?