How to Set Up a TerraMaster NAS: F4-425 Plus Beginner NAS Setup Guide
Posted: 09 Jul 2026, 15:31
Quick Answer: How Do You Set Up a TerraMaster NAS?
Setting up a TerraMaster NAS is straightforward, even for first-time users. The process typically involves six steps:
1.Install your SATA and M.2 drives
2.Connect the NAS to your router
3.Power on the device
4.Discover the NAS on your network
5.Initialize the TOS operating system
6.Create a storage pool and configure TRAID or RAID
Using the TerraMaster F4-425 Plus, most users can complete the entire NAS setup in less than 30 minutes and immediately start backing up files, storing photos, streaming media, or building a private cloud.
If you're looking for a beginner-friendly home NAS setup guide, this article walks through every step in detail.
Why More Users Are Choosing a Home NAS Instead of Public Cloud Storage?
Running out of phone storage? Tired of paying expensive monthly cloud subscription fees? Need a secure place to store family photos, videos, and work files without privacy concerns?
A Network Attached Storage (NAS) device gives you complete control of your data while providing:
Private cloud storage
Automatic photo backup
Cross-device file access
Large-capacity storage expansion
Long-term cost savings
What You'll Need Before Starting Your NAS Setup
Before beginning your how to setup a NAS journey, prepare the following items:
Included Accessories:
TerraMaster F4-425 Plus Host
Power adapter
CAT6 Ethernet cable
Full set of mounting screws (compatible with SATA/M.2)
Quick installation guide
Recommended Storage Drives For a reliable home NAS setup, NAS drives designed for 24/7 operation are highly recommended:
HDD Recommendations: Western Digital Red Plus, Seagate IronWolf (optimized for continuous running).
SSD Recommendations: NVMe SSDs with DRAM cache (best for caching, running Docker, virtual machines, and databases).
Step 1: Install NAS Drives (Setup NAS Drive)
One of the most important parts of any NAS setup guide is choosing and installing storage drives correctly.
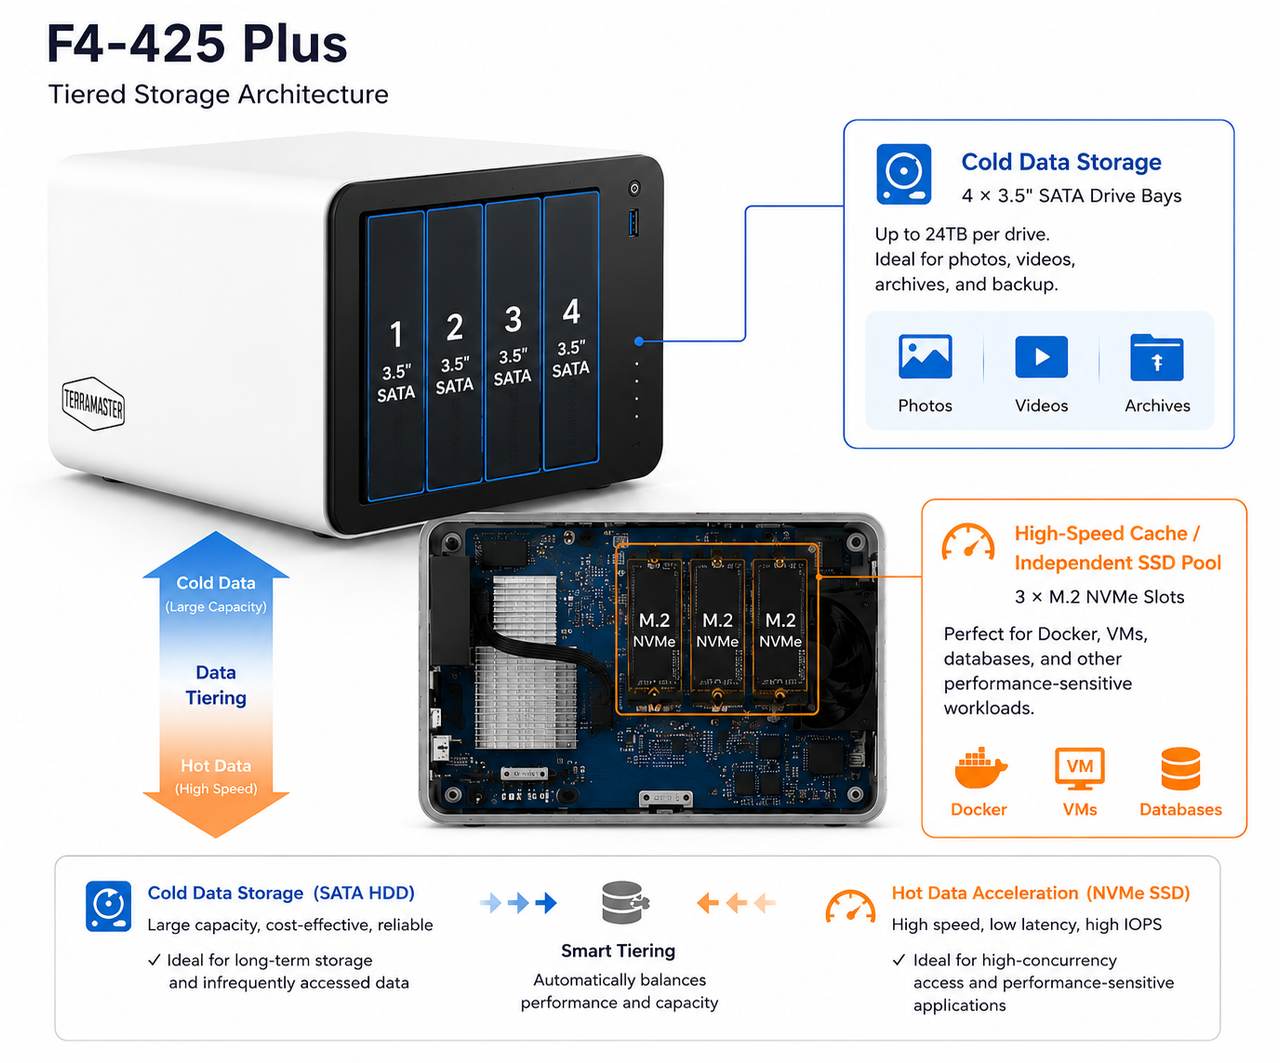
The F4-425 Plus features a unique 4+3 hybrid storage architecture:
Storage Type Quantity Core Usage
3.5" SATA HDD 4 Bays (Up to 24TB per drive) Large-capacity cold data archiving (photos, videos, docs)
M.2 NVMe SSD 3 Slots High-speed cache acceleration, Docker, VMs, databases
This architecture allows users to combine large-capacity HDDs with high-speed SSDs.
Installing SATA Hard Drives (Tool-less)
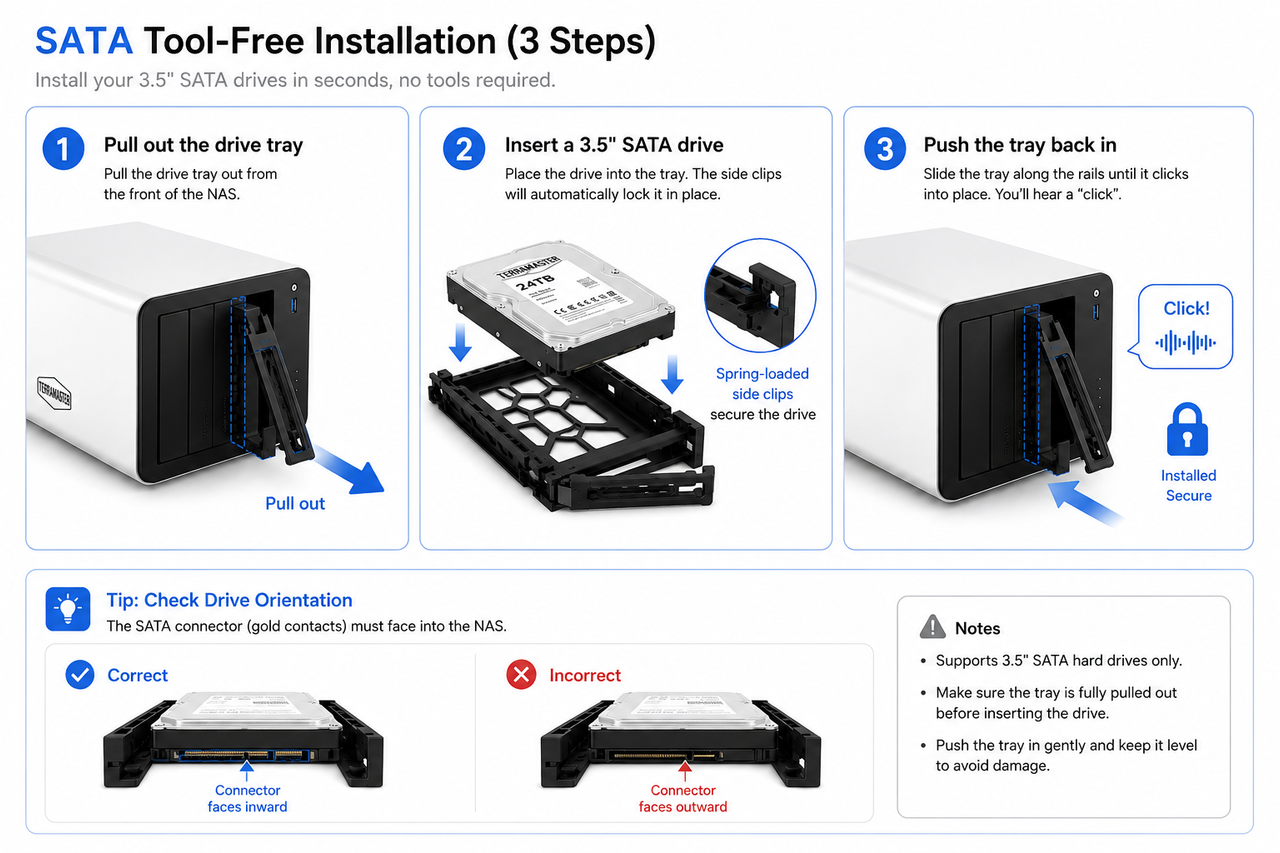
1.Pull out the front drive tray.
2.Insert the 3.5-inch HDD (it will snap into place using the side clips). Note: 2.5-inch drives require bottom screws.
3.Slide the tray back into the NAS along the rails until you hear a "click".
Important: Ensure the drive connectors (gold contacts) face inward and avoid excessive force during installation to prevent hardware damage.
Installing M.2 SSDs
1.Power off the NAS completely.
2.Remove the bottom cover.
3.Insert the SSD into the slot at a 30° angle.
4.Press down horizontally and secure it with a screw.
5.Reinstall the cover.
Step 2: Connect the NAS to Your Network (NAS Network Setup)
A successful NAS network setup requires only two connections:
Ethernet Connection
Use the included CAT6 cable to connect the NAS directly to your router. The F4-425 Plus includes dual 5GbE ports supporting Link Aggregation, allowing up to 10Gbps combined bandwidth. This is particularly useful for 4K video streaming, multi-user access, and large file transfers.
Power Connection
Connect the power adapter to a 220V wall outlet and press the power button. After approximately 1–2 minutes, the system will complete its self-test startup sequence, indicated by solid LED lights.
Step 3: Discover Your NAS on the Network
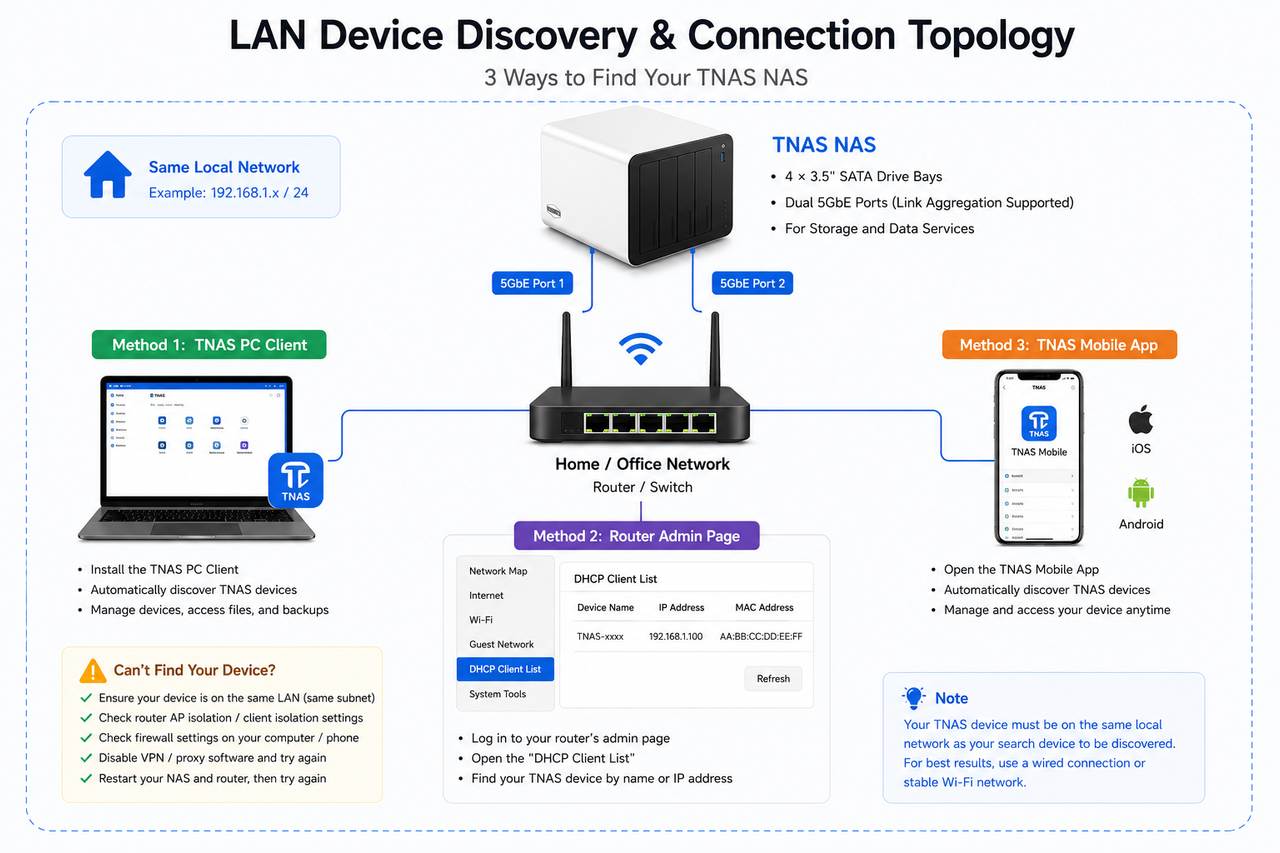
Since a NAS doesn't have a screen, there are three common methods for finding your TerraMaster NAS IP address after network setup.
Option 1: TNAS PC Client (Recommended): The easiest way for beginners. Download the app from the official website; it automatically scans your local network and provides one-click management access.
Option 2: Router Management Page: Log into your router's gateway and find the assigned IP address in the connected device list (look for "TerraMaster" or "TNAS").
Step 4: Initialize TOS Operating System
Open your web browser and enter http://NAS-IP:8181 to launch the TOS initialization wizard.
Follow the setup wizard to complete the core configurations. Recommended settings include:
Language & Time Zone: Set your preferred language and local time zone (e.g., Asia/Shanghai), and enable automatic time synchronization.
Security: Create a strong Administrator password and store it safely.
Step 5: Configure Storage (Setup NAS RAID)
One of the most common beginner questions is: Which RAID mode should I choose?
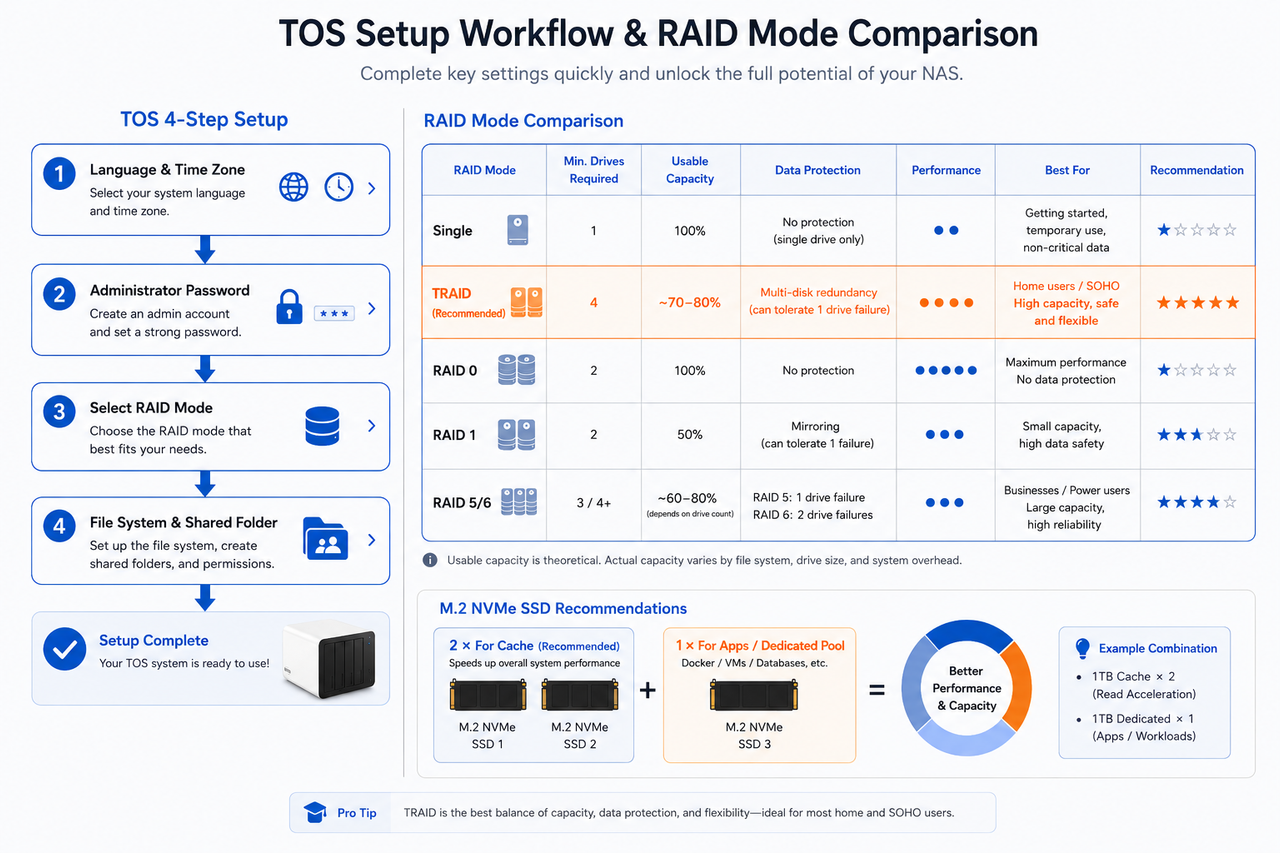
Recommended: TRAID
TRAID is TerraMaster's proprietary elastic storage technology designed specifically for beginners. It automatically balances data security and storage space, making it perfect for daily storage and backups without complex configurations.
RAID Mode Best For
TRAID Beginners, daily backups, flexible future expansion (Recommended)
Single Temporary storage of non-critical data
RAID 0 Maximum read/write speed (No data protection)
RAID 1 Highest data protection (Mirrored data)
RAID 5/6 Advanced users and small businesses
File System Choice: We highly recommend selecting the BTRFS file system, which supports snapshots, compression, and prevents accidental deletion, offering superior data security.
Step 6: Optimize Your NAS for Daily Use
To maximize the potential of your F4-425 Plus, utilize its 3 M.2 slots wisely.
Recommended SSD Configuration:
SSD #1 + SSD #2: Set up as a Global Cache to accelerate overall read/write speeds.
SSD #3: Run independently as a storage pool for heavy applications. This delivers excellent performance for Docker containers, virtual machines, and 4K transcoding tasks.
Recommended Shared Folders: Create simple categories to keep files organized: Public (Shared files), Photo (Photo backups), Video (Media library), and Backup (Exclusive data backups).
Common NAS Setup Problems and Solutions
NAS Not Found on Network
Check: Ensure your computer and NAS are on the same network segment. Turn off AP isolation on your router and temporarily disable your PC firewall.
Fix: Check the ethernet cable. If it still fails, press the RESET hole on the back for 5 seconds to restore network settings (this will not erase your data).
Forgot Administrator Password
Short RESET (5 seconds): With the NAS powered on, press the RESET hole until you hear a single beep. This resets the password and network settings while keeping all data intact.
Long RESET (10 seconds): Holding it until you hear two beeps will perform a factory reset, erasing all data. Use with extreme caution!
FAQ: Frequently Asked Questions About Home NAS Setup
How long does NAS setup take?
With tool-less drive bays and the streamlined TOS setup wizard, a complete basic setup for the F4-425 Plus takes under 30 minutes.
What hard drives should I use for a NAS?
Always use NAS-grade HDDs (like WD Red or Seagate IronWolf) designed for 24/7 continuous operation. Standard desktop drives may fail prematurely under constant NAS workloads.
Is TRAID better than RAID 5?
For home users and beginners, yes. TRAID allows you to mix and match drives of different capacities seamlessly, offering much greater flexibility for future storage expansion compared to the strict identical-drive requirements of standard RAID 5.
Can I set up a NAS without technical knowledge?
Absolutely. Modern operating systems like TerraMaster's TOS provide simple, step-by-step graphical interfaces. You don't need to know coding or networking to successfully complete a home NAS setup.
How much storage do I need for a home NAS?
For basic document and photo backup, 4TB to 8TB is usually sufficient. If you plan to store 4K movies or run a Plex server, consider starting with at least 16TB to 32TB of total raw capacity.
Final Thoughts: Is the TerraMaster F4-425 Plus a Good NAS for Beginners?
If you've been searching for a complete NAS setup guide or wondering how to setup a NAS without an IT degree, the answer is a resounding yes. The TerraMaster F4-425 Plus is specifically designed to eliminate the steep learning curve typically associated with a home NAS setup.
Here is exactly why it stands out for first-time users:
Zero-Math Storage Management: Thanks to the proprietary TRAID system, you don't need to calculate complex array configurations or worry about matching drive capacities. The system automatically balances data protection and storage efficiency for you.
Desktop-Level Smoothness: Powered by the Intel N150 processor and next-gen DDR5 memory, it handles everything from basic file backups to streaming 4K media without breaking a sweat.
Future-Proof Hybrid Architecture: The unique 4+3 (SATA + M.2) design means you can start small with standard hard drives for your initial NAS network setup, and easily add high-speed NVMe SSDs later when you are ready to experiment with Docker, databases, or virtual machines.
Blazing Fast Transfers: With dual 5GbE ports, backing up gigabytes of family photos or accessing large work files feels just as fast and seamless as using a local USB drive.
Ultimately, a successful beginner NAS installation shouldn't end with just getting the device turned on—it should be the start of taking back control of your digital life. The F4-425 Plus gives you the security and massive capacity of an enterprise data center.
Setting up a TerraMaster NAS is straightforward, even for first-time users. The process typically involves six steps:
1.Install your SATA and M.2 drives
2.Connect the NAS to your router
3.Power on the device
4.Discover the NAS on your network
5.Initialize the TOS operating system
6.Create a storage pool and configure TRAID or RAID
Using the TerraMaster F4-425 Plus, most users can complete the entire NAS setup in less than 30 minutes and immediately start backing up files, storing photos, streaming media, or building a private cloud.
If you're looking for a beginner-friendly home NAS setup guide, this article walks through every step in detail.
Why More Users Are Choosing a Home NAS Instead of Public Cloud Storage?
Running out of phone storage? Tired of paying expensive monthly cloud subscription fees? Need a secure place to store family photos, videos, and work files without privacy concerns?
A Network Attached Storage (NAS) device gives you complete control of your data while providing:
Private cloud storage
Automatic photo backup
Cross-device file access
Large-capacity storage expansion
Long-term cost savings
What You'll Need Before Starting Your NAS Setup
Before beginning your how to setup a NAS journey, prepare the following items:
Included Accessories:
TerraMaster F4-425 Plus Host
Power adapter
CAT6 Ethernet cable
Full set of mounting screws (compatible with SATA/M.2)
Quick installation guide
Recommended Storage Drives For a reliable home NAS setup, NAS drives designed for 24/7 operation are highly recommended:
HDD Recommendations: Western Digital Red Plus, Seagate IronWolf (optimized for continuous running).
SSD Recommendations: NVMe SSDs with DRAM cache (best for caching, running Docker, virtual machines, and databases).
Step 1: Install NAS Drives (Setup NAS Drive)
One of the most important parts of any NAS setup guide is choosing and installing storage drives correctly.
The F4-425 Plus features a unique 4+3 hybrid storage architecture:
Storage Type Quantity Core Usage
3.5" SATA HDD 4 Bays (Up to 24TB per drive) Large-capacity cold data archiving (photos, videos, docs)
M.2 NVMe SSD 3 Slots High-speed cache acceleration, Docker, VMs, databases
This architecture allows users to combine large-capacity HDDs with high-speed SSDs.
Installing SATA Hard Drives (Tool-less)
1.Pull out the front drive tray.
2.Insert the 3.5-inch HDD (it will snap into place using the side clips). Note: 2.5-inch drives require bottom screws.
3.Slide the tray back into the NAS along the rails until you hear a "click".
Important: Ensure the drive connectors (gold contacts) face inward and avoid excessive force during installation to prevent hardware damage.
Installing M.2 SSDs
1.Power off the NAS completely.
2.Remove the bottom cover.
3.Insert the SSD into the slot at a 30° angle.
4.Press down horizontally and secure it with a screw.
5.Reinstall the cover.
Step 2: Connect the NAS to Your Network (NAS Network Setup)
A successful NAS network setup requires only two connections:
Ethernet Connection
Use the included CAT6 cable to connect the NAS directly to your router. The F4-425 Plus includes dual 5GbE ports supporting Link Aggregation, allowing up to 10Gbps combined bandwidth. This is particularly useful for 4K video streaming, multi-user access, and large file transfers.
Power Connection
Connect the power adapter to a 220V wall outlet and press the power button. After approximately 1–2 minutes, the system will complete its self-test startup sequence, indicated by solid LED lights.
Step 3: Discover Your NAS on the Network
Since a NAS doesn't have a screen, there are three common methods for finding your TerraMaster NAS IP address after network setup.
Option 1: TNAS PC Client (Recommended): The easiest way for beginners. Download the app from the official website; it automatically scans your local network and provides one-click management access.
Option 2: Router Management Page: Log into your router's gateway and find the assigned IP address in the connected device list (look for "TerraMaster" or "TNAS").
Step 4: Initialize TOS Operating System
Open your web browser and enter http://NAS-IP:8181 to launch the TOS initialization wizard.
Follow the setup wizard to complete the core configurations. Recommended settings include:
Language & Time Zone: Set your preferred language and local time zone (e.g., Asia/Shanghai), and enable automatic time synchronization.
Security: Create a strong Administrator password and store it safely.
Step 5: Configure Storage (Setup NAS RAID)
One of the most common beginner questions is: Which RAID mode should I choose?
Recommended: TRAID
TRAID is TerraMaster's proprietary elastic storage technology designed specifically for beginners. It automatically balances data security and storage space, making it perfect for daily storage and backups without complex configurations.
RAID Mode Best For
TRAID Beginners, daily backups, flexible future expansion (Recommended)
Single Temporary storage of non-critical data
RAID 0 Maximum read/write speed (No data protection)
RAID 1 Highest data protection (Mirrored data)
RAID 5/6 Advanced users and small businesses
File System Choice: We highly recommend selecting the BTRFS file system, which supports snapshots, compression, and prevents accidental deletion, offering superior data security.
Step 6: Optimize Your NAS for Daily Use
To maximize the potential of your F4-425 Plus, utilize its 3 M.2 slots wisely.
Recommended SSD Configuration:
SSD #1 + SSD #2: Set up as a Global Cache to accelerate overall read/write speeds.
SSD #3: Run independently as a storage pool for heavy applications. This delivers excellent performance for Docker containers, virtual machines, and 4K transcoding tasks.
Recommended Shared Folders: Create simple categories to keep files organized: Public (Shared files), Photo (Photo backups), Video (Media library), and Backup (Exclusive data backups).
Common NAS Setup Problems and Solutions
NAS Not Found on Network
Check: Ensure your computer and NAS are on the same network segment. Turn off AP isolation on your router and temporarily disable your PC firewall.
Fix: Check the ethernet cable. If it still fails, press the RESET hole on the back for 5 seconds to restore network settings (this will not erase your data).
Forgot Administrator Password
Short RESET (5 seconds): With the NAS powered on, press the RESET hole until you hear a single beep. This resets the password and network settings while keeping all data intact.
Long RESET (10 seconds): Holding it until you hear two beeps will perform a factory reset, erasing all data. Use with extreme caution!
FAQ: Frequently Asked Questions About Home NAS Setup
How long does NAS setup take?
With tool-less drive bays and the streamlined TOS setup wizard, a complete basic setup for the F4-425 Plus takes under 30 minutes.
What hard drives should I use for a NAS?
Always use NAS-grade HDDs (like WD Red or Seagate IronWolf) designed for 24/7 continuous operation. Standard desktop drives may fail prematurely under constant NAS workloads.
Is TRAID better than RAID 5?
For home users and beginners, yes. TRAID allows you to mix and match drives of different capacities seamlessly, offering much greater flexibility for future storage expansion compared to the strict identical-drive requirements of standard RAID 5.
Can I set up a NAS without technical knowledge?
Absolutely. Modern operating systems like TerraMaster's TOS provide simple, step-by-step graphical interfaces. You don't need to know coding or networking to successfully complete a home NAS setup.
How much storage do I need for a home NAS?
For basic document and photo backup, 4TB to 8TB is usually sufficient. If you plan to store 4K movies or run a Plex server, consider starting with at least 16TB to 32TB of total raw capacity.
Final Thoughts: Is the TerraMaster F4-425 Plus a Good NAS for Beginners?
If you've been searching for a complete NAS setup guide or wondering how to setup a NAS without an IT degree, the answer is a resounding yes. The TerraMaster F4-425 Plus is specifically designed to eliminate the steep learning curve typically associated with a home NAS setup.
Here is exactly why it stands out for first-time users:
Zero-Math Storage Management: Thanks to the proprietary TRAID system, you don't need to calculate complex array configurations or worry about matching drive capacities. The system automatically balances data protection and storage efficiency for you.
Desktop-Level Smoothness: Powered by the Intel N150 processor and next-gen DDR5 memory, it handles everything from basic file backups to streaming 4K media without breaking a sweat.
Future-Proof Hybrid Architecture: The unique 4+3 (SATA + M.2) design means you can start small with standard hard drives for your initial NAS network setup, and easily add high-speed NVMe SSDs later when you are ready to experiment with Docker, databases, or virtual machines.
Blazing Fast Transfers: With dual 5GbE ports, backing up gigabytes of family photos or accessing large work files feels just as fast and seamless as using a local USB drive.
Ultimately, a successful beginner NAS installation shouldn't end with just getting the device turned on—it should be the start of taking back control of your digital life. The F4-425 Plus gives you the security and massive capacity of an enterprise data center.