Page 1 of 1
[Discussion] New VMs version 1.0.051
Posted: 26 Jun 2026, 10:35
by polen
I just wanted to say thank you for continuing to update VMs application.
I updated with no problems.
- Windows 11 Pro 25H2 worked with no issues.
- Home Assistant on Linux worked with no issues.
I did not see any updates with usb-passthrough in the release notes so did not expect it to work for my Cygnal Integrated Products, Inc. HubZ Smart Home Controller USB device and it did not.
Re: [Discussion] New VMs version 1.0.051
Posted: 26 Jun 2026, 18:44
by rfbjr
Only my F4-424 Pro has VMs installed, how long after you logon is the app icon in the taskbar suppose to indicate there is an update(s)?
Just curious, since I saw the post I knew there was one anyway.
Re: [Discussion] New VMs version 1.0.051
Posted: 27 Jun 2026, 14:20
by EriChan
polen wrote: ↑26 Jun 2026, 10:35
Thank you for your proactive feedback! Your suggestions are very important to us. Our product team has received your input and is currently evaluating the USB passthrough functionality. We will prioritize improvements on this matter in our upcoming roadmap for future enhancements.
Re: [Discussion] New VMs version 1.0.051 [SOLVED]
Posted: 25 Jul 2026, 20:46
by zeratyx
Hello,
I'm trying to install Home Assistant on TOS 7 with VMs (version 1.0.055) but it's not working. How do I do it ?
Re: [Discussion] New VMs version 1.0.051
Posted: 26 Jul 2026, 00:31
by MikeZhang
The entire process consists of three main steps, with the configuration of the virtual machine's network being the most critical.
Download the HAOS disk image: First, download the disk image file suitable for virtual machines (usually in .qcow2 or .vmdk format) from the official Home Assistant website.
Create a virtual machine in TOS 7:
Log in to the TOS 7 system and open the VMs (Virtual Machines) app.
Click "Add VM" to create a new virtual machine.
When configuring the settings, select "Linux" as the Operating System (OS) type.
Allocate resources: It is recommended to allocate at least 2GB of RAM and 2 virtual CPU cores to ensure Home Assistant runs smoothly.
Disk: For the "Primary vDisk Location," select "Manual" and upload or specify the HAOS image file you downloaded earlier.
Key Step: Configure the virtual machine network:
This is the most critical step; incorrect configuration will prevent the virtual machine from accessing the network.
In the virtual machine's network settings, select "br0" (or a similar bridge mode option) for the "Network Source." This allows the virtual machine to connect directly to your LAN—just like other devices in your home—and obtain its own independent IP address.
Select "virtio" for the "Network Model."
Once these settings are complete, you can start the virtual machine. Wait for it to finish booting up (this may take a few minutes), then access the Home Assistant initialization interface via your browser at `
http://homeassistant.local:8123` or by using the IP address displayed on the virtual machine's startup screen.
Re: [Discussion] New VMs version 1.0.051
Posted: 26 Jul 2026, 01:49
by zeratyx
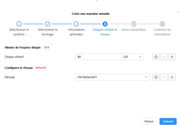
Thank you for your reply. It works fine at first, but after configuring the disk and network settings, it doesn't match. Here's the screen with no options available.
Re: [Discussion] New VMs version 1.0.051
Posted: 26 Jul 2026, 19:45
by zeratyx
Thank you, I finally succeeded.
Re: [Discussion] New VMs version 1.0.051
Posted: 27 Jul 2026, 21:57
by angelor
Hi,
i'm trying to install HA OS using the new TOS7-VMs.
As you know the Home Assistant does not provide the iso file as VMs needed to install the virtual machine.
I tryed different ways to "convert" the HA .vdi or .qcow2 to iso but without success (different problems and also the iso created was not bootable...etc etc).
can you help please to install HA? or to convert the file to ISO bootable?
Many thanks in advance. Bye.
Angelo
Re: [Discussion] New VMs version 1.0.051
Posted: 28 Jul 2026, 10:30
by EriChan
You cannot convert HAOS (.qcow2 or .vdi) into a bootable ISO because Home Assistant OS is a pre-installed disk image containing UEFI partitions, not an installation installer.
Here is the tested procedure to install HAOS in TOS 7 VMs:
1. Download & Extract: Download the official KVM/QEMU (.qcow2.xz) image from the Home Assistant website and extract the .qcow2 file.
2. Open VMs App: Launch the VMs application in TOS 7.
3. Import Image: Go to the Image module in VMs and import the extracted .qcow2 file.
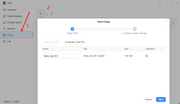
4. Import VM: Switch to the Virtual Machine tab, click Import, select "Import from disk image" , choose your .qcow2 file, and complete the VM setup.
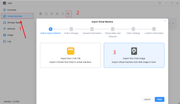
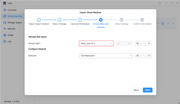
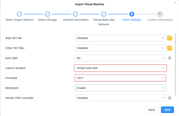
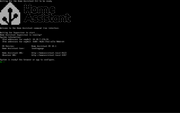 Crucial Configuration Settings:
- Boot Mode (UEFI): In the VM firmware/boot settings, ensure the boot mode is set to UEFI (HAOS will not boot under Legacy BIOS).
- Boot Device: Make sure Virtual Disk is selected as the boot location.
- Resources: Assign at least 2 vCPUs and 2GB RAM, then power on the VM. It will boot straight into HAOS.
Hope this helps!
Re: [Discussion] New VMs version 1.0.051
Posted: 29 Jul 2026, 16:39
by angelor
Many Thanks EriChan, it works!!!!
Bye