How to use an iSCSI LUN as additional storage?
Posted: 25 Apr 2026, 15:19
What is iSCSI?
iSCSI is a standard specification for storage networking based on network protocols, suitable for connecting multiple data storage devices. iSCSI runs SCSI commands over an IP network, enabling data transmission over a Local Area Network (LAN) or Wide Area Network (WAN). With iSCSI, the operating system of a client computer treats storage space on a storage server as a local hard drive. In fact, data written to this virtual drive is transmitted over the network to the storage server.
This article contains the following:
I. iSCSI Manager User Guide
II. How to connect and use an iSCSI LUN in Windows (using Windows 11 as an example)
III. How to connect and use an iSCSI LUN in TNAS
I. iSCSI Manager User Guide
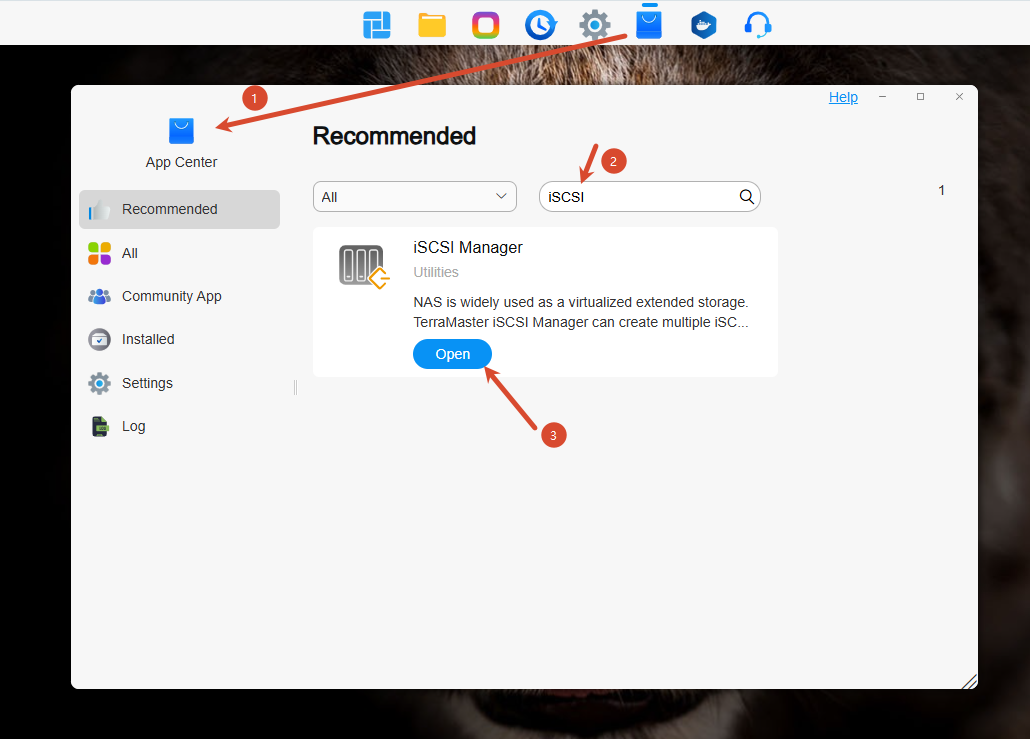
1. Download, install, and enable it from the TOS App Center.
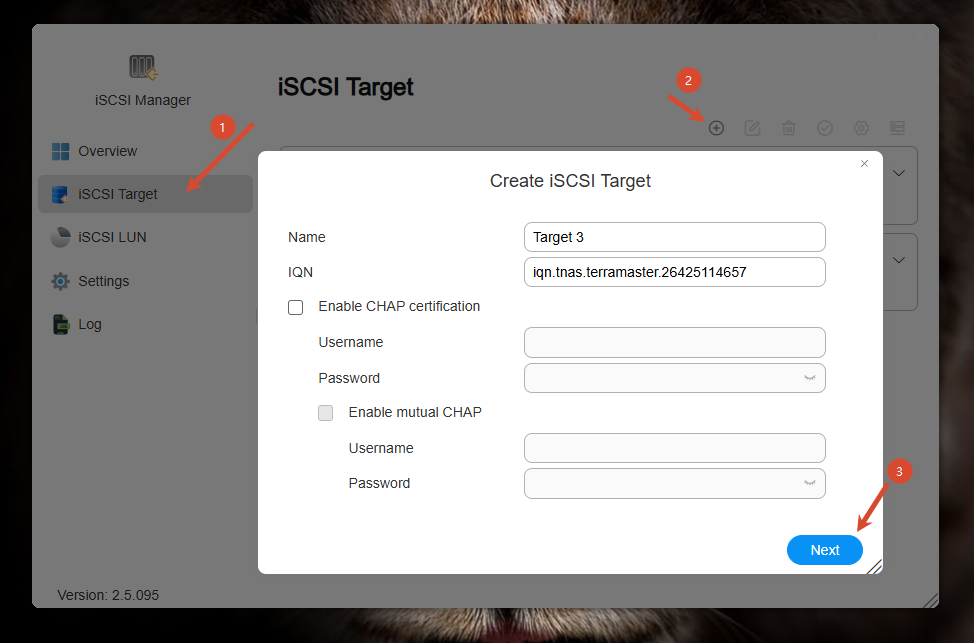
2. Open iSCSI Manager, and select iSCSI Target in the right navigation bar. Click Create and complete the relevant configuration for the iSCSI Target.
Note: Checking "Multiple Connections" during creation allows multiple clients to connect and use the target (not recommended, as it may lead to performance issues, data consistency problems, storage conflicts, etc.).
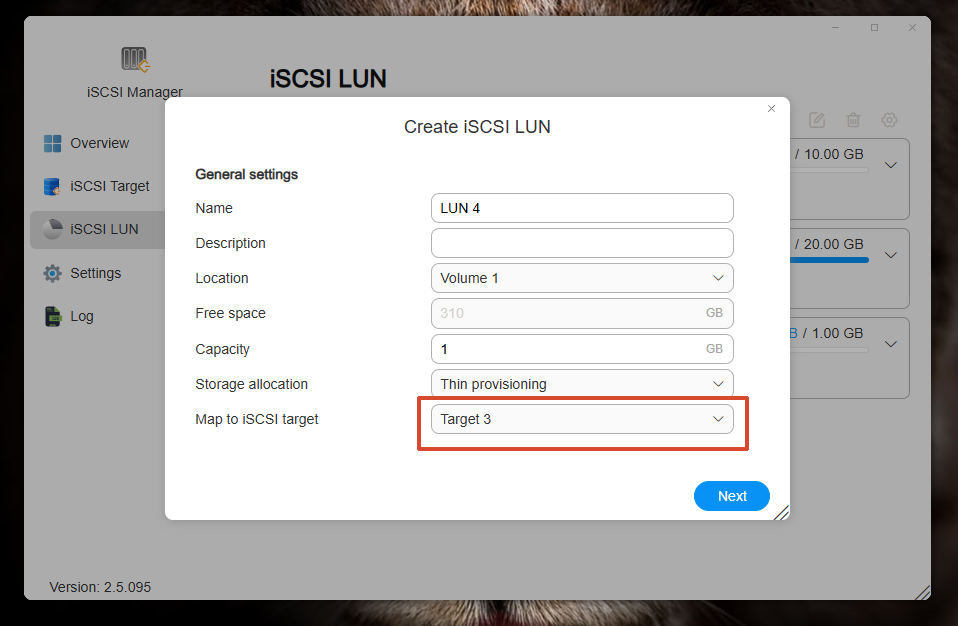
3. Select iSCSI LUN in the right navigation bar. Click Create and complete the relevant configuration for the iSCSI LUN.
① "Location" selection determines which volume's space this LUN will use.
② "Capacity" defaults to 1 GB, and the capacity setting can only be increased, not decreased.
③ "Space Allocation" modes: Thin Provisioning (supports snapshot technology, on-demand space allocation), Thick Provisioning (does not support snapshot technology, pre-allocated space).
④ "Map to iSCSI Target" – select the iSCSI Target you just created.
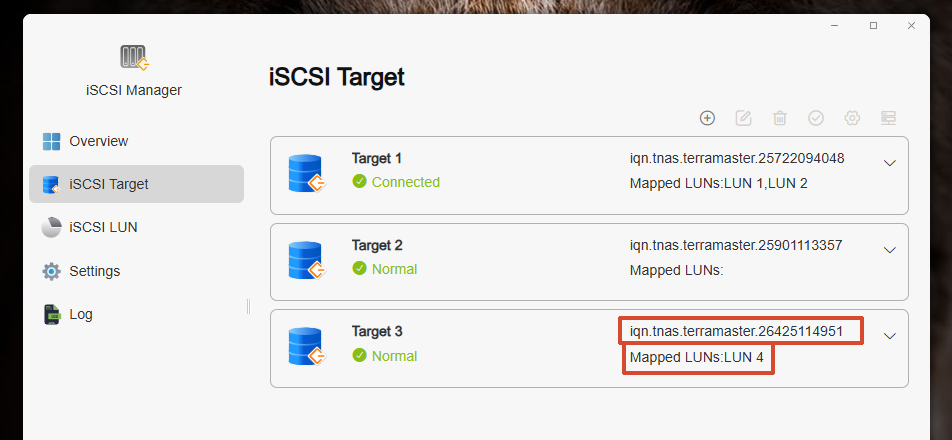
4. Verify that the iSCSI Target and iSCSI LUN are configured correctly.
Select iSCSI Target in the right navigation bar. You can see the Target's IQN and the mapped LUN.
II. How to connect and use an iSCSI LUN in Windows (using Windows 11 as an example)
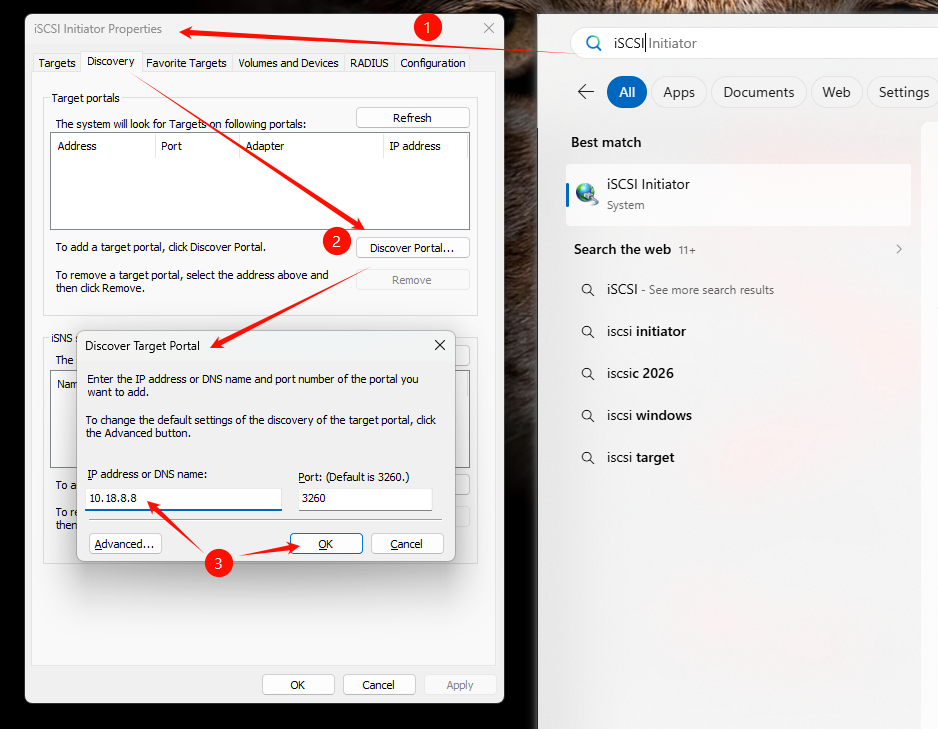
1. Press Windows key + S key, and type "iSCSI Initiator".
Click Discovery -> Discover Portal -> Add IP address, and it will appear in the Target Portals.
2. Click Targets -> Refresh. Under Discovered Targets, select the target configured in iSCSI Manager and click Connect.
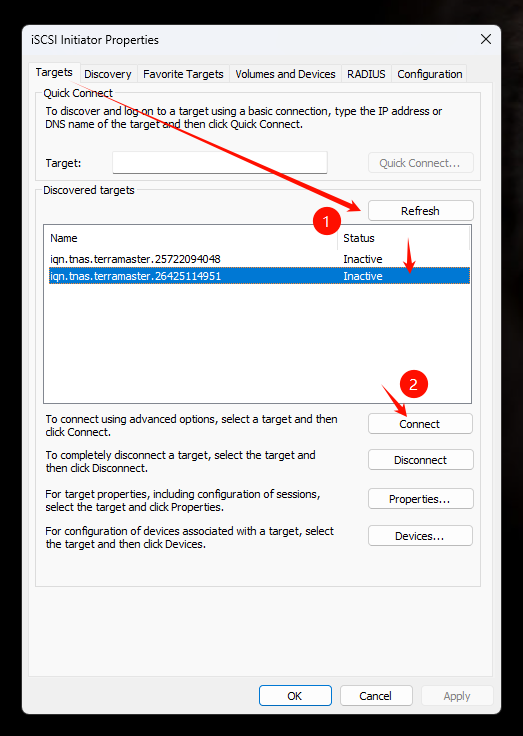
3. If you configured advanced settings for the target (e.g., CRC checking or CHAP), click Advanced to complete the corresponding settings. If not, click OK to finish.
4. Press Windows key + S key, and type "Computer Management". Select Disk Management from the left panel.
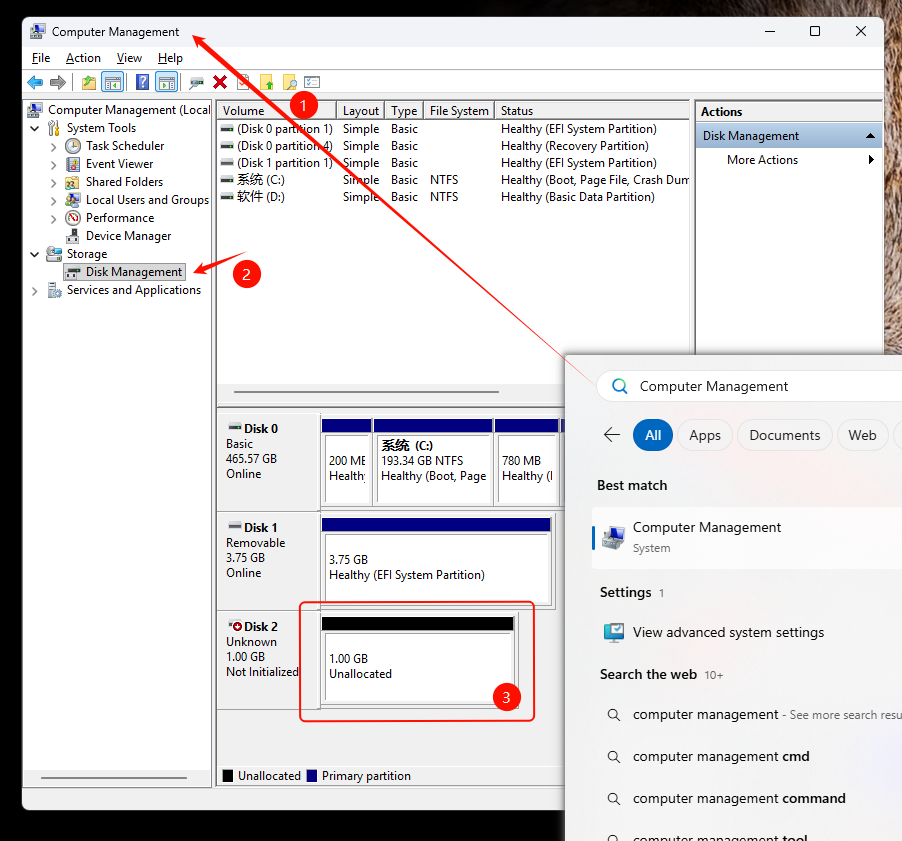
5. Right-click the disk that matches the size of your LUN and select Online -> Initialize Disk.
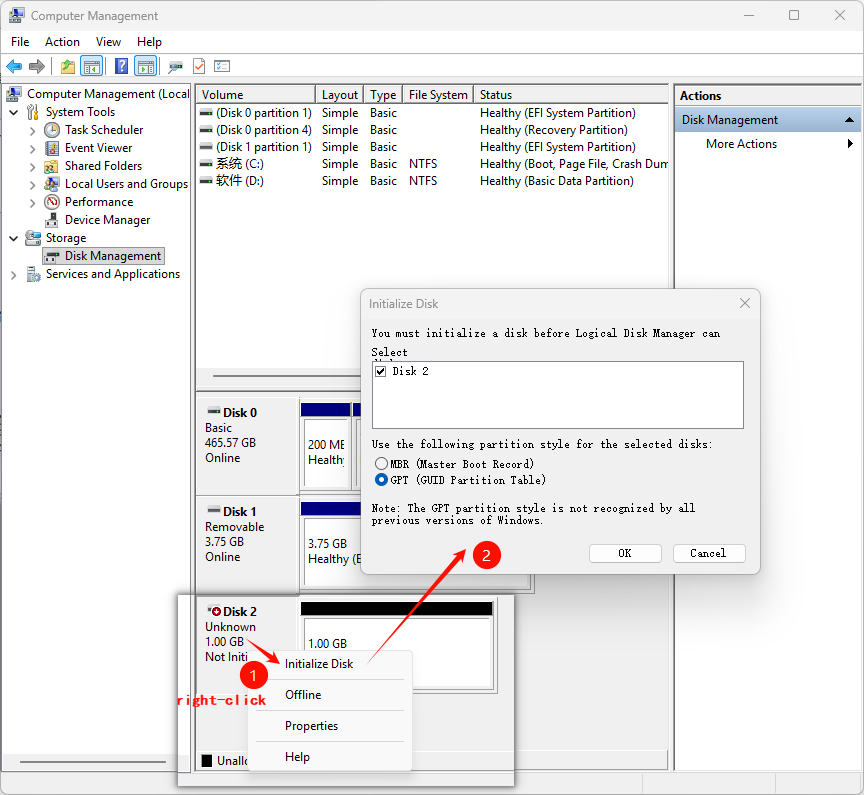
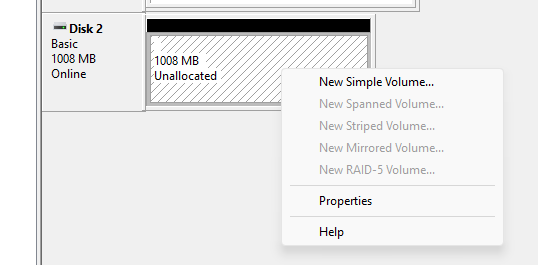
6. Your LUN is now online and initialized. Right-click the disk and select New Simple Volume. Follow the wizard to complete the operation.
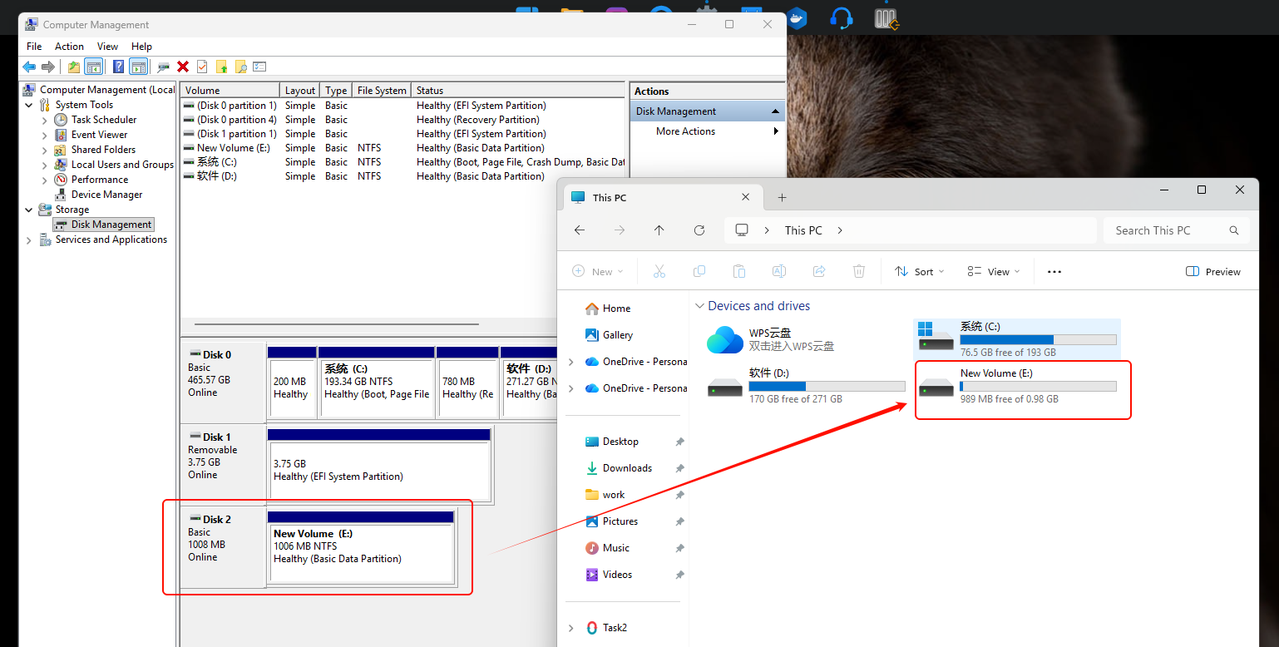
7. Configuration complete. Your Windows now has an additional drive with an assigned drive letter as extra storage.
III. How to connect and use an iSCSI LUN in TNAS
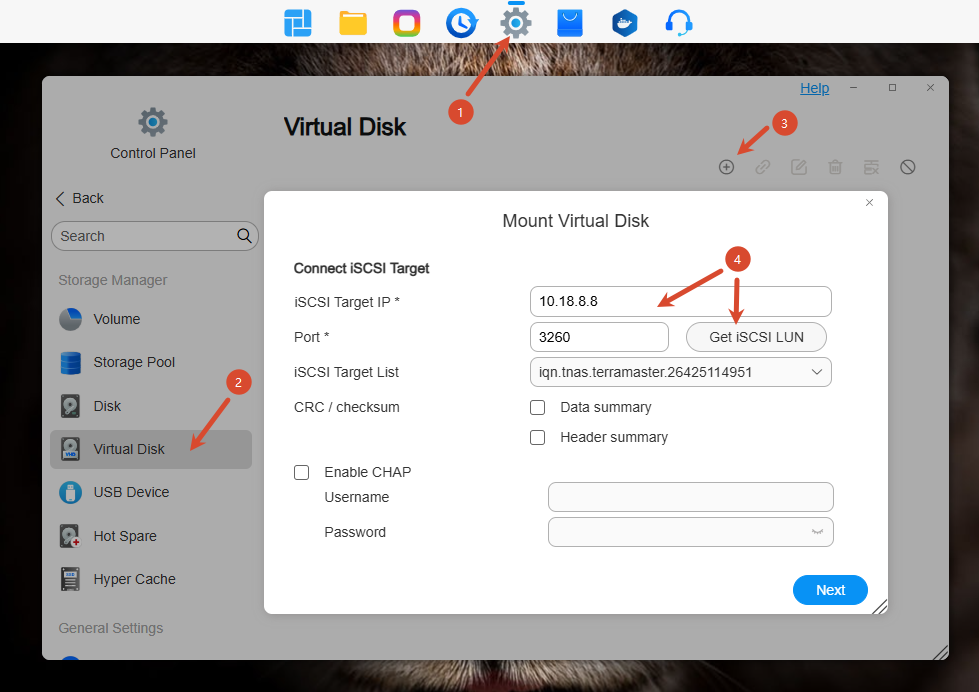
1. Click Control Panel -> Virtual Disk -> Mount -> Add IP Address -> Get iSCSI LUN.
If you configured advanced settings for the target (e.g., CRC checking or CHAP), complete the corresponding settings. If not, click Next to finish.
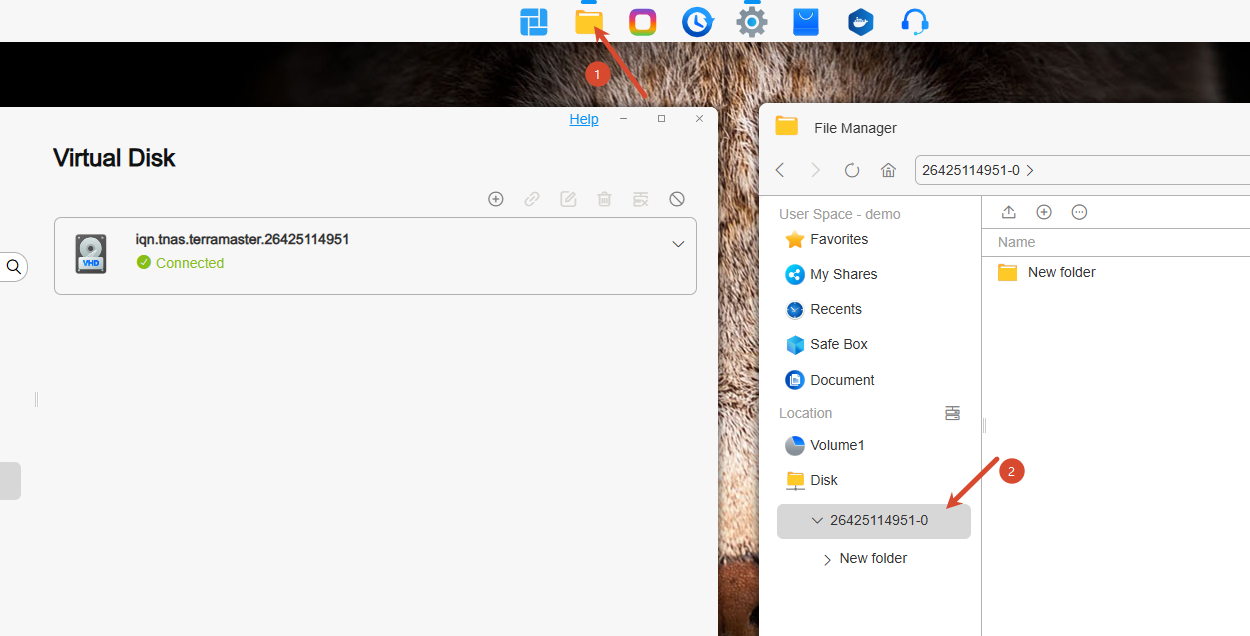
2. After successful mounting, you now have an additional storage space, which can be viewed through File Management.
iSCSI is a standard specification for storage networking based on network protocols, suitable for connecting multiple data storage devices. iSCSI runs SCSI commands over an IP network, enabling data transmission over a Local Area Network (LAN) or Wide Area Network (WAN). With iSCSI, the operating system of a client computer treats storage space on a storage server as a local hard drive. In fact, data written to this virtual drive is transmitted over the network to the storage server.
This article contains the following:
I. iSCSI Manager User Guide
II. How to connect and use an iSCSI LUN in Windows (using Windows 11 as an example)
III. How to connect and use an iSCSI LUN in TNAS
I. iSCSI Manager User Guide
1. Download, install, and enable it from the TOS App Center.
2. Open iSCSI Manager, and select iSCSI Target in the right navigation bar. Click Create and complete the relevant configuration for the iSCSI Target.
Note: Checking "Multiple Connections" during creation allows multiple clients to connect and use the target (not recommended, as it may lead to performance issues, data consistency problems, storage conflicts, etc.).
3. Select iSCSI LUN in the right navigation bar. Click Create and complete the relevant configuration for the iSCSI LUN.
① "Location" selection determines which volume's space this LUN will use.
② "Capacity" defaults to 1 GB, and the capacity setting can only be increased, not decreased.
③ "Space Allocation" modes: Thin Provisioning (supports snapshot technology, on-demand space allocation), Thick Provisioning (does not support snapshot technology, pre-allocated space).
④ "Map to iSCSI Target" – select the iSCSI Target you just created.
4. Verify that the iSCSI Target and iSCSI LUN are configured correctly.
Select iSCSI Target in the right navigation bar. You can see the Target's IQN and the mapped LUN.
II. How to connect and use an iSCSI LUN in Windows (using Windows 11 as an example)
1. Press Windows key + S key, and type "iSCSI Initiator".
Click Discovery -> Discover Portal -> Add IP address, and it will appear in the Target Portals.
2. Click Targets -> Refresh. Under Discovered Targets, select the target configured in iSCSI Manager and click Connect.
3. If you configured advanced settings for the target (e.g., CRC checking or CHAP), click Advanced to complete the corresponding settings. If not, click OK to finish.
4. Press Windows key + S key, and type "Computer Management". Select Disk Management from the left panel.
5. Right-click the disk that matches the size of your LUN and select Online -> Initialize Disk.
6. Your LUN is now online and initialized. Right-click the disk and select New Simple Volume. Follow the wizard to complete the operation.
7. Configuration complete. Your Windows now has an additional drive with an assigned drive letter as extra storage.
III. How to connect and use an iSCSI LUN in TNAS
1. Click Control Panel -> Virtual Disk -> Mount -> Add IP Address -> Get iSCSI LUN.
If you configured advanced settings for the target (e.g., CRC checking or CHAP), complete the corresponding settings. If not, click Next to finish.
2. After successful mounting, you now have an additional storage space, which can be viewed through File Management.