After upgrading to TOS 7, it returns to the installation page, or prompts for a failed kernel version load when logging!

About TNAS hardware
LordP
Posts: 57
Joined: 24 Jul 2025, 01:16
United States of America

Re: After upgrading to TOS 7, it returns to the installation page, or prompts for a failed kernel version load when logg

Post by LordP »

I am going to lose my mind.

F4-423. The BIOS did not need updating.

I installed a 512GB NVMe to install the latest TOS. All went well, I can boot and I see TOS-7. It updated once more.

I have the NVMe set as boot option #2.

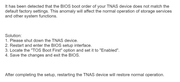
When I add drives to the NAS I get this:
Image

I tried making Boot Option #1 as the NVMe but that didn't work.

If I remove the hard drives, then I can boot without any issues.

How can I fix this?

The hard drives were in this NAS before, I did not format them. The NVMe is brand new, and as I said it works just fine. If I insert the hard drive AFTER I boot from the NVMe, the system sees the hard drives and I can mount them, but if I reboot, I get that error message.

Please help.
F4-423
TOS version is 6.0.694
BIOS is 5.19
Hard drives 4x ST24000NT002-3N1101 24TB Iron Wolf Pro
TOS - Crucial P310 4TB PCIe Gen4 2280 NVMe M.2
Hypercache - Crucial P310 4TB PCIe Gen4 2280 NVMe M.2
OWC 32GB (2x16GB) DDR4 3200 PC4-25600 CL22
User avatar
MikeZhang
TM Support
Posts: 430
Joined: 05 Sep 2023, 22:21

Re: After upgrading to TOS 7, it returns to the installation page, or prompts for a failed kernel version load when logg

Post by MikeZhang »

Thank you for the detailed information. Based on your description, the issue is most likely caused by the existing hard drives still containing old TOS system partitions from the previous installation.

Since the new NVMe SSD is now the system disk, we recommend removing the old system partitions from the previous system disks. This does not require formatting the hard drives or deleting the existing data.

Please follow these steps:

1. Power off the TNAS and remove the existing hard drives.
2. Leave only the new NVMe SSD installed and boot the TNAS normally.
3. After successfully entering TOS, insert the original hard drives while TOS is running.
4. Wait until TOS detects the hard drives and confirms that the existing data/storage pools are accessible.
Go to: Storage Management → Disks → System Disk

In the System Disk list, identify the non-current/old system disks that still contain the previous TOS system.
Select the old system disk(s) and choose Delete/Remove to remove the old system partition.
Important: Please make sure you select the old system disk/system partition, not the storage pool or data volume. Do not select “Erase Disk,” “Delete Storage Pool,” or format the hard drives.

After the old system partitions have been removed, reboot the TNAS with the NVMe SSD and the hard drives installed.
The purpose of this operation is to make the new NVMe the only active TOS system disk, while keeping the existing data on the hard drives intact.
Please also make sure that the NVMe SSD is selected as the first boot device in the BIOS/UEFI.
To contact our team, please send email to following addresses, remember to replace (at) with @

Technical team: support(at)terra-master.com(for technical support)
Service team: service(at)terra-master.com(for purchasing, return, replacement, RMA service)
User avatar
wviegas
Posts: 1
Joined: 03 Sep 2026, 08:30
Portugal

Re: After upgrading to TOS 7, it returns to the installation page, or prompts for a failed kernel version load when logg

Post by wviegas »

F2-423 here.
2x 256gb NVMe.
NVMe1 is the system disk, NVMe2 its for hypercache and the 2xHDDs are for storage. what is the course of action here?
User avatar
CursaYang
TM Support
Posts: 896
Joined: 06 Jan 2025, 16:34
China

Re: After upgrading to TOS 7, it returns to the installation page, or prompts for a failed kernel version load when logg

Post by CursaYang »

wviegas wrote: 03 Sep 2026, 08:36 F2-423 here.
2x 256gb NVMe.
NVMe1 is the system disk, NVMe2 its for hypercache and the 2xHDDs are for storage. what is the course of action here?
This configuration appears to be fully functional with no issues. If you are currently experiencing abnormal operation, you may refer to the method mentioned by Mike: navigate to the Storage Management > Disks > System Disks page, and remove the system installations on all disks except for NVMe1.
To contact our team, please send email to following addresses, remember to replace (at) with @

Technical team: support(at)terra-master.com(for technical support)
Service team: service(at)terra-master.com(for purchasing, return, replacement, RMA service)
Post Reply

Return to “Hardware”