Troubleshooting of using Thunderbolt 3 devices after updating Mac OS to Big Sur
Posted: 26 Nov 2020, 12:25
Applicable Models:
D4Thunderbolt3, D5Thunderbolt3, D8Thunderbolt3, D16Thunderbolt3.
Phenomenon
Due to the update of Mac OS to Big Sur, many kinds of devices could not be used properly. To D4 Thunderbolt3, D5 Thunderbolt3 and D8 Thunderbolt3, the possible failures are : buzzer alarms, file transfer corrupted or hard drives missing from the RAID.
Instructions
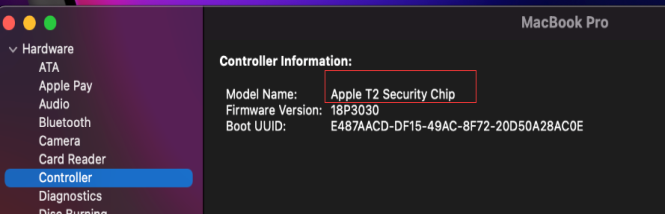
1. Please check whether your Mac is equipped with Apple T2 security chip.
Mac OS system controller is divided into T2 security chip or non-T2 security chip. If the system has Apple T2 security chip, follow the steps below; if there is no T2 security chip, you can skip step2.
Please log in as system administrator, and go to System Information > Controller to check whether it's Apple T2 Security Chip.
2. Disable Apple T2 Security Chip
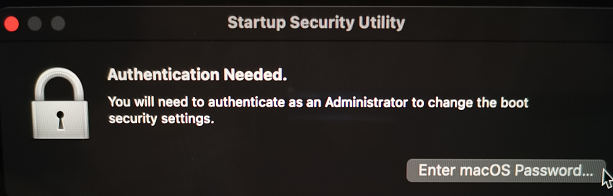
2.1 Restart your macOS and press Command +R to enter Mac OS Recovery.
2.2 Go to Utilities → Startup Security Utility, click Enter macOS Password to enter the correct password.
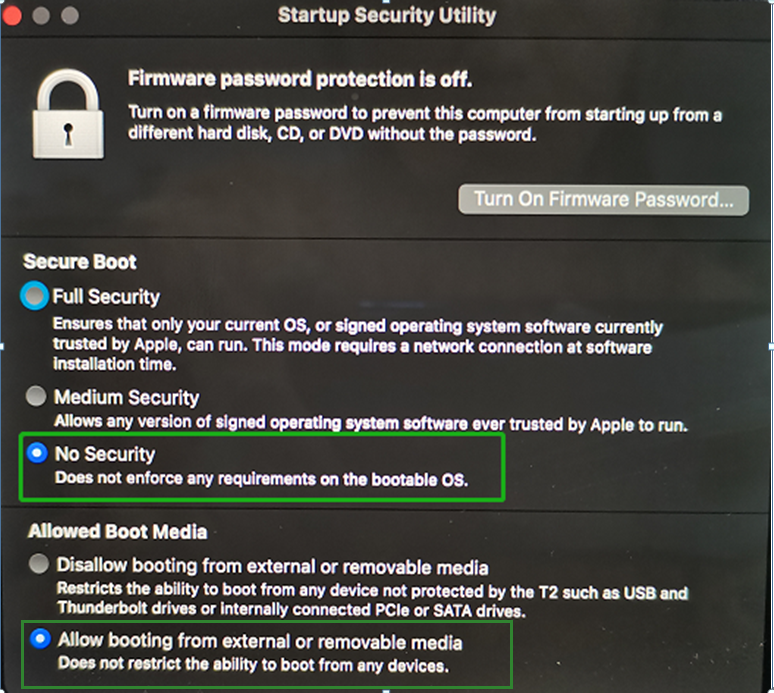
2.3 Please check No Security and Allow booting from external or removable media.
2.4 Restart your macOS by clicking Restart from Apple menu.
3. Uninstall the RAID Controller Driver
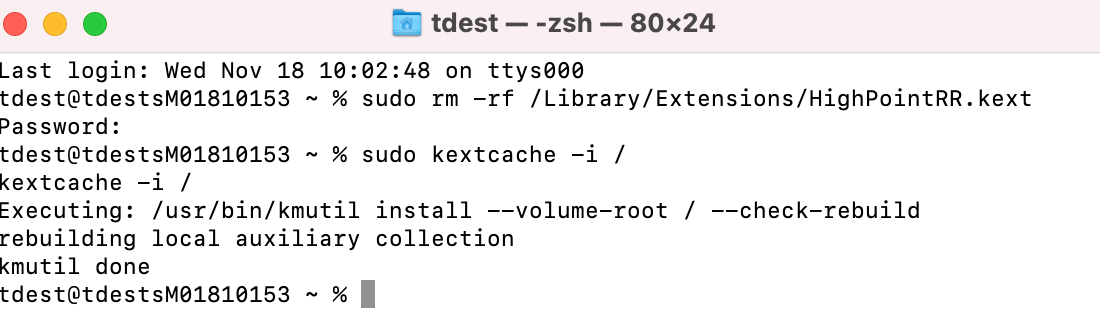
3.1 To uninstall HighPointRR RAID controller drive, please go to Utilities to open Terminal and input the following command: sudo rm –rf /Library/Extensions/HighPointRR.kext, then press Enter key.

3.2 Input your password of macOS at Password bar, and press Enter key. Please be noted that the password is invisible here.
3.3 Input the command sudo kextcache -i /, and press Enter key.
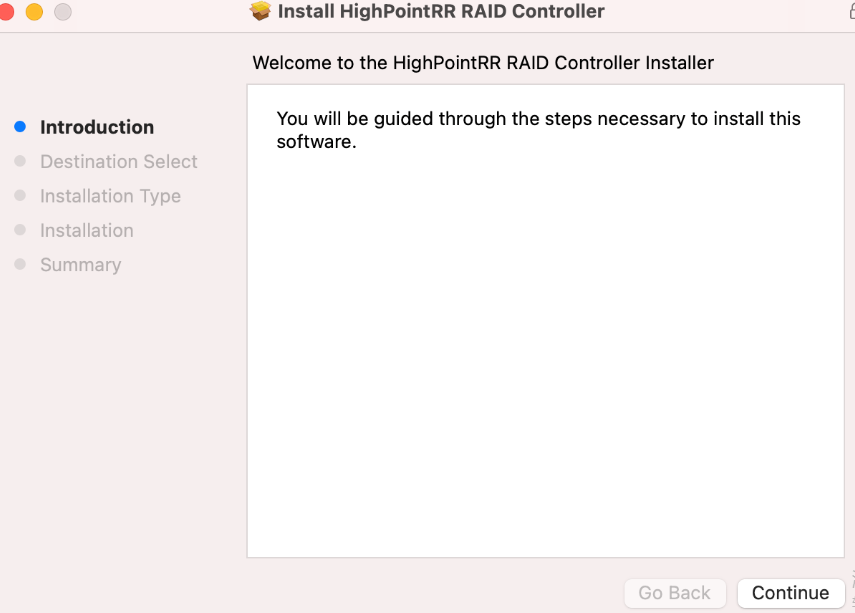
4. Install RAID driver
4.1 RAID driver download link: https://download2.terra-master.com/T327 ... %20Mac.zip
4.2 Double click HighPointRR.pkg to start installation.
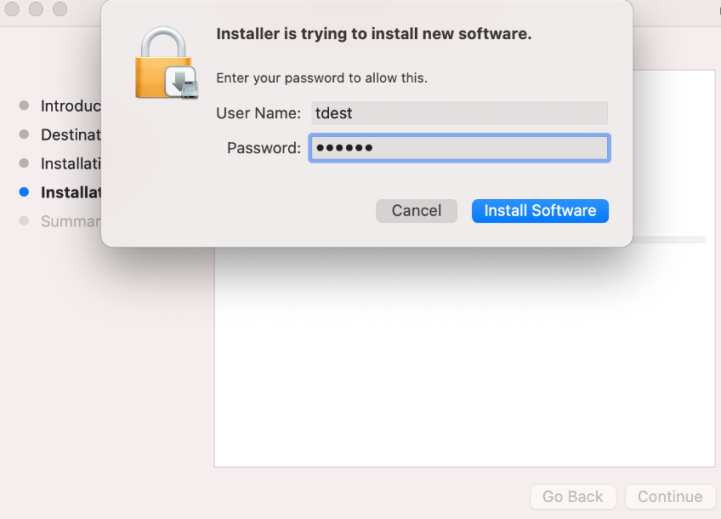
4.3 Enter the required username and password and click Install Software when the follow window is prompted.
4.4 If no window prompted, please click Next and Restart to reboot your system.

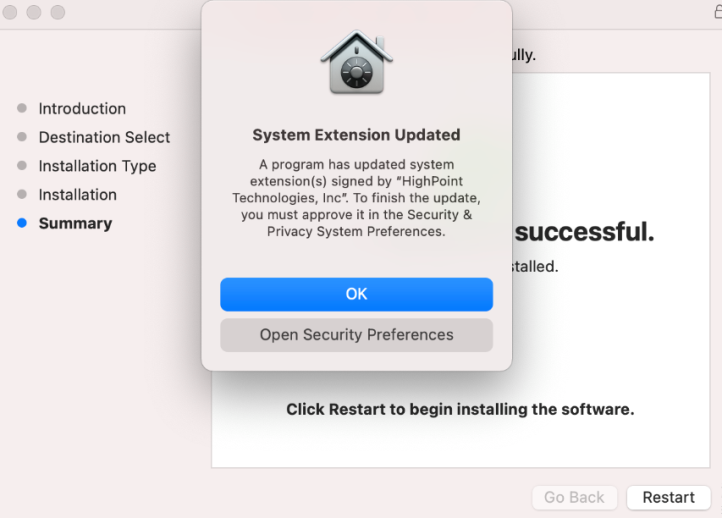
4.5 Please click Open Security Preferences when the System Extension Updated window prompted.
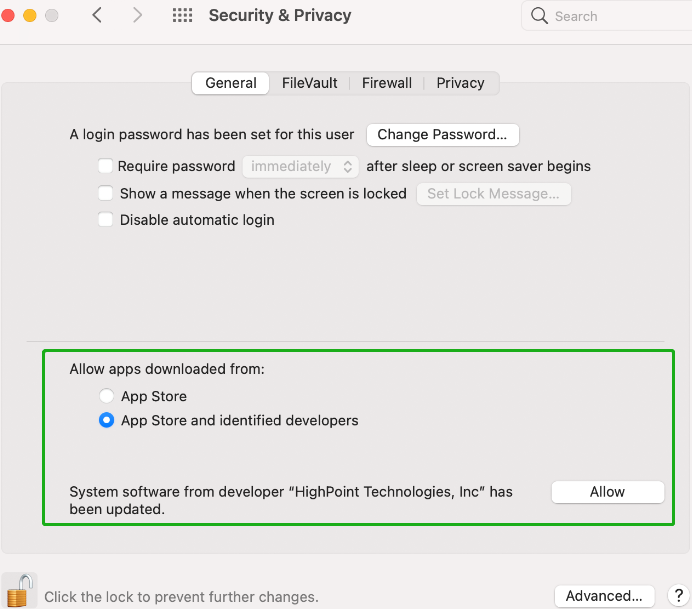
4.6 Check ‘App Store and identified developers’ and click Allow.
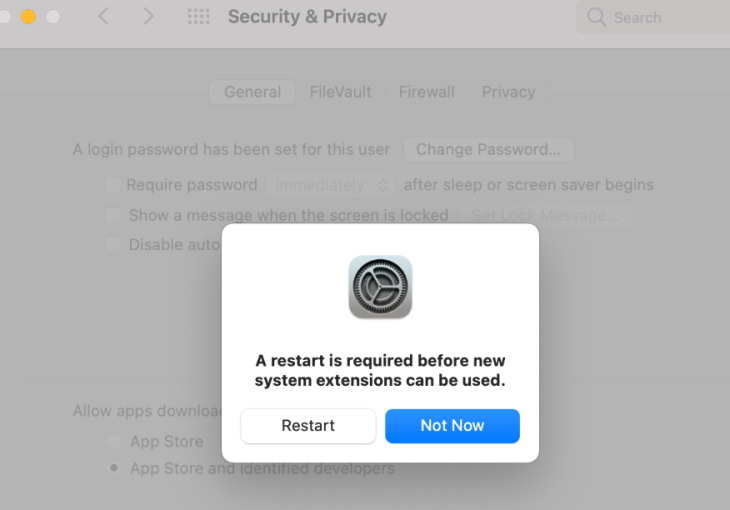
4.7 A prompt window asks you to restart the system will be prompted, please click Not Now.
4.8 Go back to RAID Controller installation window and click Restart to reboot the system.

5. Please check whether the drive is installed successfully
5.1 Please log in as administrator, and go to Utilities - Terminal.
5.2 Input the command line sudo su and press Enter key.
5.3 Input the password of your Mac OS and press Enter.
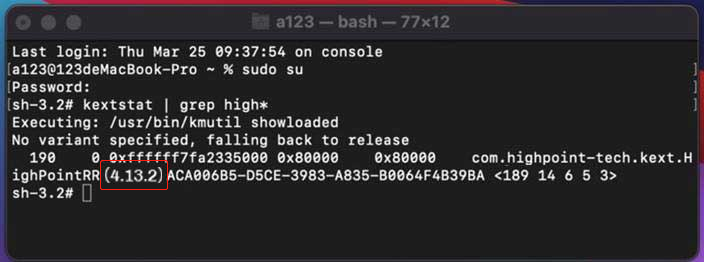
5.4 Input the command line kextstat | grep high* and press Enter.
5.5 Please ensure that the version number is 4.13.2.
5.6 The RAID controller drive is installed successfully.
D4Thunderbolt3, D5Thunderbolt3, D8Thunderbolt3, D16Thunderbolt3.
Phenomenon
Due to the update of Mac OS to Big Sur, many kinds of devices could not be used properly. To D4 Thunderbolt3, D5 Thunderbolt3 and D8 Thunderbolt3, the possible failures are : buzzer alarms, file transfer corrupted or hard drives missing from the RAID.
Instructions
1. Please check whether your Mac is equipped with Apple T2 security chip.
Mac OS system controller is divided into T2 security chip or non-T2 security chip. If the system has Apple T2 security chip, follow the steps below; if there is no T2 security chip, you can skip step2.
Please log in as system administrator, and go to System Information > Controller to check whether it's Apple T2 Security Chip.
2. Disable Apple T2 Security Chip
2.1 Restart your macOS and press Command +R to enter Mac OS Recovery.
2.2 Go to Utilities → Startup Security Utility, click Enter macOS Password to enter the correct password.
2.3 Please check No Security and Allow booting from external or removable media.
2.4 Restart your macOS by clicking Restart from Apple menu.
3. Uninstall the RAID Controller Driver
3.1 To uninstall HighPointRR RAID controller drive, please go to Utilities to open Terminal and input the following command: sudo rm –rf /Library/Extensions/HighPointRR.kext, then press Enter key.
3.2 Input your password of macOS at Password bar, and press Enter key. Please be noted that the password is invisible here.
3.3 Input the command sudo kextcache -i /, and press Enter key.
4. Install RAID driver
4.1 RAID driver download link: https://download2.terra-master.com/T327 ... %20Mac.zip
4.2 Double click HighPointRR.pkg to start installation.
4.3 Enter the required username and password and click Install Software when the follow window is prompted.
4.4 If no window prompted, please click Next and Restart to reboot your system.
4.5 Please click Open Security Preferences when the System Extension Updated window prompted.
4.6 Check ‘App Store and identified developers’ and click Allow.
4.7 A prompt window asks you to restart the system will be prompted, please click Not Now.
4.8 Go back to RAID Controller installation window and click Restart to reboot the system.
5. Please check whether the drive is installed successfully
5.1 Please log in as administrator, and go to Utilities - Terminal.
5.2 Input the command line sudo su and press Enter key.
5.3 Input the password of your Mac OS and press Enter.
5.4 Input the command line kextstat | grep high* and press Enter.
5.5 Please ensure that the version number is 4.13.2.
5.6 The RAID controller drive is installed successfully.