To use a RAID hardware controller, you need to install the RAID controller driver on your computer, otherwise the computer will not be able to recognize and manage RAID.
Applicable Models
D4 Thunderbolt3, D5 Thunderbolt3(D5-330), D8 Thunderbolt3(D8-332), D16 Thunderbolt3(D16-331)
Applicable macOS
macOS Big Sur 11.x
macOS Monterey 12.x
macOS Ventura 13.x
macOS Sonoma 14.x
Thunderbolt 3 RAID Driver Installation Video Guide(Apple T2): https://youtu.be/MEDPuHsFdUI
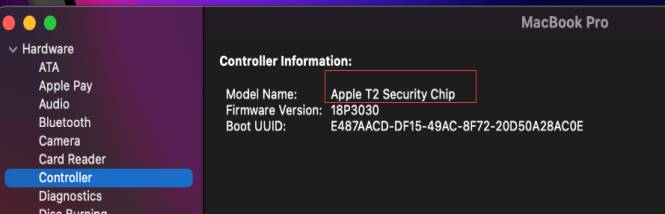
Step 1: Check whether the Mac computer has an Apple T2 security chip. The Mac OS system controller is divided into whether there is an Apple T2 or Apple M1/M2 security chip. If there is no Apple T2 or Apple M1/M2 security chip, you can skip the second step.
How to view Apple T2: You can go to [Apple Icon→About This Machine→System Report→Controller] to check whether it has Apple T2. If [Controller Information] shows Apple T2, your Mac has an Apple T2 security chip.
Step 2: Change the security policy
The controller is the operation guide of Apple T2 security chip
2.1. When restarting the Mac OS system, keep pressing the [Command + R] buttons at the same time until you enter the [Mac OS Recovery Page].
2.2. Click [Utilities→Start Security Utility], a dialog box will appear, prompting you to set up as an administrator, click the [Enter Mac OS Password...] button, and enter the Mac OS password.

2.3. Enter the [Start Security Utility] page, please check [No Security] and [Allow booting from external or removable media].
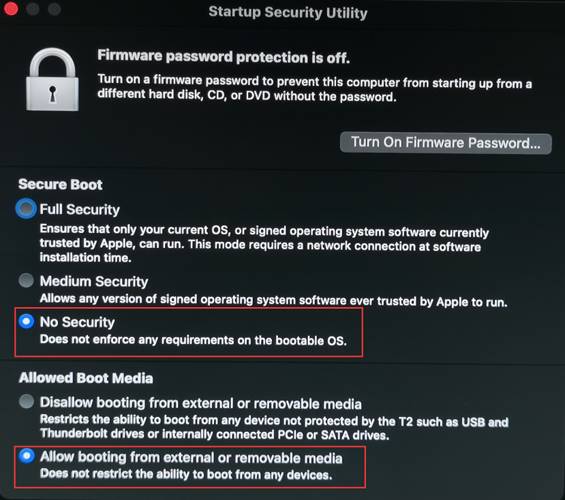
2.4. After completing the operation, select [Restart] from the menu.
Step 3: Install the driver
3.1. Download the driver: https://download2.terra-master.com/T3_R ... 220608.pkg
3.2. Find the downloaded driver file, then double-click the software package to start the installation program, and click the [Continue] button.
3.3. Mac OS will prompt you to install the driver, click the [Install] button.
3.4. The system will prompt to enter the administrator username and password, and then click [Software Installation]
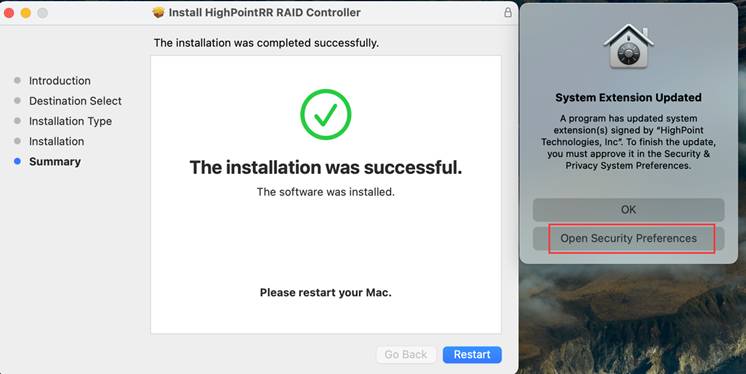
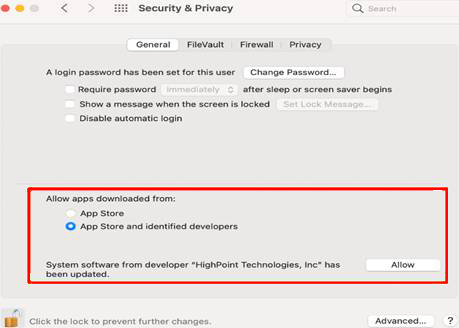
3.5. Pay attention to the [Security and Privacy] pop-up window prompt, click [Open Security Preferences] and click Allow to run [Enable System Extensions], please don't ignore it.
Special reminder: Click [Open Security Preferences] to pop up [Security and Privacy Window]
3.6. After making sure that [App Store and Approved Developers] is selected, click on [Allow]:
3.7. You will receive a "Privacy and Security Reminder" pop-up window. Please enter the macOS username and password, and confirm [Modify Settings].
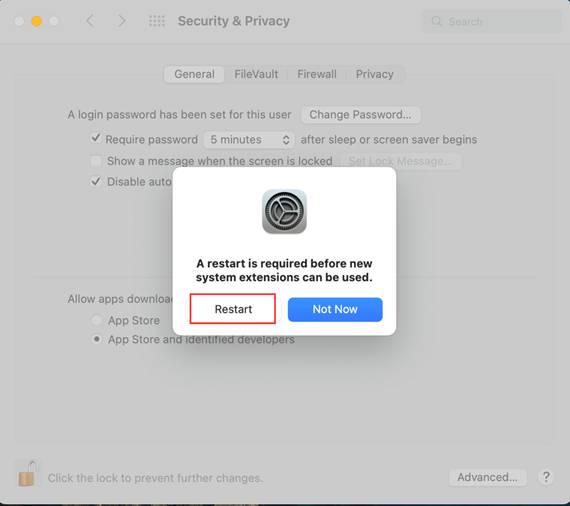
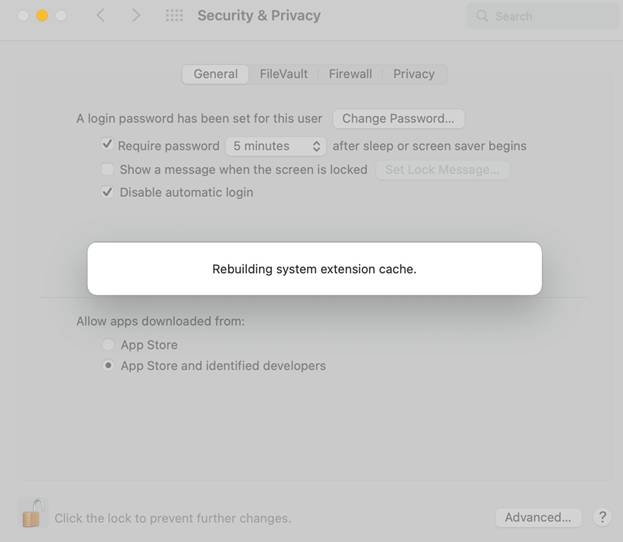
3.8. You will receive a pop-up window. Click the [Restart] button to execute the system expansion cache reconstruction. After the execution is complete, click the [Restart] button.
Step 4: Check whether the driver is installed successfully
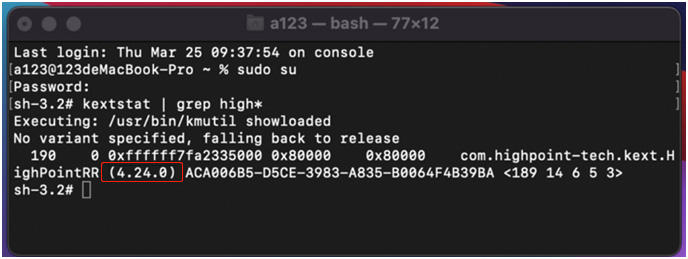
4.1. Please keep the Thunderbolt 3 device turned on and connected to the computer, log in to the Mac OS as a system administrator [Go → Utilities] and open the [Terminal] window.
4.2. Enter the following command and press Enter: sudo su
4.3. After completion, enter the Mac OS password in the Password field, and then press Enter (note that the password will not be displayed).
4.4. Enter the following command and press Enter: kextstat | grep high*
4.5. Please confirm that the version is 4.24.0
4.6. Congratulations on the successful installation of the driver and the Thunderbolt3 device can be used.